简客-记忆

抽象的才是永恒的

0%

目前只能是客户端 为经过压缩的发送 json数据给后端,因为easayswoole 的 swoole_websocket_frame $frame
会根据长度进行裁剪

比如客户端发送二进制

1
2
3
Uint8Array(27) [0, 5, 10, 15, 10, 4, 116, 101, 120, 116, 18, 7, 115, 115, 115, 115, 115, 115, 115, 16, 123, 26, 4, 99, 104, 97, 116]
上面待办的文字是以下字符串的压缩
{"Message":{"Type":"text","ContentJson":"sssssss"},"ToId":123,"ToType":"chat"}

通过
swoole_websocket_frame后被裁剪成

1
2
3
4
5
6
7
8
9
10
11
12
object(Swoole\WebSocket\Frame)#186 (4) {
["fd"]=>
int(1)
["data"]=>
string(27) "

textsssssss{chat"
["opcode"]=>
int(2)
["finish"]=>
bool(true)
}

但是这个27是转换成字符串的长度

[TOC]

定义结构体

// 在src/server/msg/lobby.proto下定义结构体
在script/protocol/lobby.proto下定义结构体
ChatREQ // 消息发送
ChatACK // 消息送达

1
2
3
4
5
6
7
8
9
10
11
12
13
14
15
16
17
18
19
20
21
22
23
24
25
26
27
// 基础用户信息id头像昵称
message UserBaseInfo{
string Uid = 1;
string NickName = 2;
string Avatar = 3;
}
// 消息体
// 如 type=text ContentJson={text:"你好"}
// 如 type=image ContentJson={image:"xxx.png",height:100,width:100}
// 因为不同的type,ContentJson的结构不同,所以为字符串类型
message ChatMessage{
string Type = 1;
string ContentJson = 2;
}
// 消息发送
message ChatREQ {
ChatMessage Message=1;
uint32 ToId=2;
string ToType=3;
}
// 消息送达
message ChatACK {
UserBaseInfo From=1;
ChatMessage Message=2;
uint32 ToId=3;
string ToType=4;
}

生成**.pb.go

ps:需要本机有protobuf环境安装

1
2
protoc --proto_path=IMPORT_PATH --go_out=DST_DIR path/to/file.proto

目前我是放在当前目录下面的
在src/server/msg目录下执行

1
protoc --go_out=./ *.proto

如果是给php用的

1
2
protoc --php_out=./ *.proto

注册到消息处理器

src/server/msg/msg.go

1
2
3
4
5
6
7
8
9
10
11
12
13
14
15
16
17
18
19
package msg

import (
"github.com/name5566/leaf/network/protobuf"
)

// 使用 Protobuf 消息处理器
var Processor = protobuf.NewProcessor()

func init() {
Processor.Register(&Test{})
Processor.Register(&UserLogin{})
Processor.Register(&UserRegister{})
Processor.Register(&UserResult{})
Processor.Register(&UserST{})
Processor.Register(&ChatREQ{})
Processor.Register(&ChatACK{})
}

在路由中监听ChatREQ

src/server/gate/router.go

1
2
3
4
5
6
7
8
9
10
11
12
13
14
15
package gate

import (
"server/game"
"server/msg"
)

func init() {
// 这里指定消息 路由到 game 模块
msg.Processor.SetRouter(&msg.Test{}, game.ChanRPC)
msg.Processor.SetRouter(&msg.UserLogin{}, game.ChanRPC)
msg.Processor.SetRouter(&msg.UserRegister{}, game.ChanRPC)
msg.Processor.SetRouter(&msg.ChatREQ{}, game.ChanRPC)
}

在handle中进行业务处理

src/server/game/internal/handler.go

1
2
3
4
5
6
7
func init() {
// 向当前模块(game 模块)注册 消息处理函数
handler(&msg.Test{}, handleTest)
handler(&msg.UserLogin{}, handleUserLogin)
handler(&msg.UserRegister{}, handleUserRegister)
handler(&msg.ChatREQ{}, handleChatREQ)
}
1
2
3
4
5
6
7
8
9
10
11
12
13
14
15
16
17
18
19
20
func handleChatREQ(args []interface{}){
m := args[0].(*msg.ChatREQ)
a := args[1].(gate.Agent)
log.Debug("receive GetMessage message:%v", m.GetMessage())

myInfo := &msg.UserBaseInfo{
Uid:"11",
NickName:"张三",
Avatar:"sss.png",
}

retBuf := &msg.ChatACK{
From : myInfo,
Message : m.GetMessage(),
ToId : m.GetToId(),
ToType : m.GetToType(),
}
// 给发送者回应一个 Test 消息
a.WriteMsg(retBuf)
}

客户端用相同的lobby.proto去生成protocol.js

ps需客户端安装protobufjs

1
npm install -g protobufjs

在所在目录执行以下命令生成protocol.js

1
pbjs -t static-module -w commonjs -o protocol.js lobby.proto

修改文件内的

1
2
// var $protobuf = require("protobufjs/minimal");
var $protobuf = window.protobuf;

把protocol.js转成ts的

1
pbts -o protocol.d.ts protocol.js

客户端发送消息

1
2
3
messageservice.ready(()=>{
messageservice.sendChatTest()
})
1
2
3
4
public sendChatTest(){
console.log('=====sendChatTest')
this._sendBuffMsg('ChatREQ',{Message:{'Type':'text','ContentJson':'{text:"laiba"}'},ToId:123,ToType:"chat"})
}
1
2
3
4
5
6
7
8
9
// 对接 leaf 的发送
private _sendBuffMsg(proName:string,data:{}){
let msgid = WebsocketService.ProtocolId[proName]
let message = msg[proName].create(data);
let buffer = msg[proName].encode(message).finish();
//leaf 前两位为协议序号,故需包装一下
let addtag_buffer = WebsocketService.protoBufAddtag(msgid,buffer);
this.ws.send(addtag_buffer)
}

客户端接受消息

1
2
3
4
5
6
7
8
9
10
11
12
13
14
15
16
17
18
19
20
21
22
23
24
25
26
27
28
29
30
31
32
33
34
35
36
37
38
39
40
41
42
43
44
45
46
47
48
49
50
51
52
53
54
55
56
57
58
export class WebsocketService {

public ws:WebSocket

static ProtocolId={
Test:0,
ChatREQ:5,
ChatACK:6,
// TestEchoACK:1234,// protocol/test 内的demo
}

private offline_callback_arr:Array<Function>;

constructor() {
this.offline_callback_arr = []
this.init();
}
/**
* 初始化参数
*/
private init() {
let self = this
let ws = new WebSocket("ws://x.x.x.x:3653");
this.ws = ws
ws.binaryType = "arraybuffer";

ws.onopen = (evt) => {
console.log("Connection open ...");
if(this.offline_callback_arr.length > 0){
this.offline_callback_arr.forEach( callback => {
console.log('发送离线时的事件')
callback()
})
this.offline_callback_arr = []
}
};

ws.onmessage = function(evt) {

if (evt.data instanceof ArrayBuffer ){
// leaf的解析
// leaf 前两位为协议序号,需要解一下啊协议序号
let retdata = WebsocketService.parseProtoBufId(evt);
let id = retdata.id;
let data = retdata.data;
self.dealMessage(id,data);

}else{
console.log("Require array buffer format")
}

};

ws.onclose = function(evt) {
console.log("Connection closed.");
};

}
1
2
3
4
5
6
7
8
9
10
11
12
13
14
15
16
17
dealMessage(id: number,data: Uint8Array ){
switch(id){
case WebsocketService.ProtocolId.Test:
this.dealTest(data)
break;
case WebsocketService.ProtocolId.ChatACK:
this.dealChatACK(data)
break;
default:
break;
}
}
dealChatACK(data: Uint8Array){
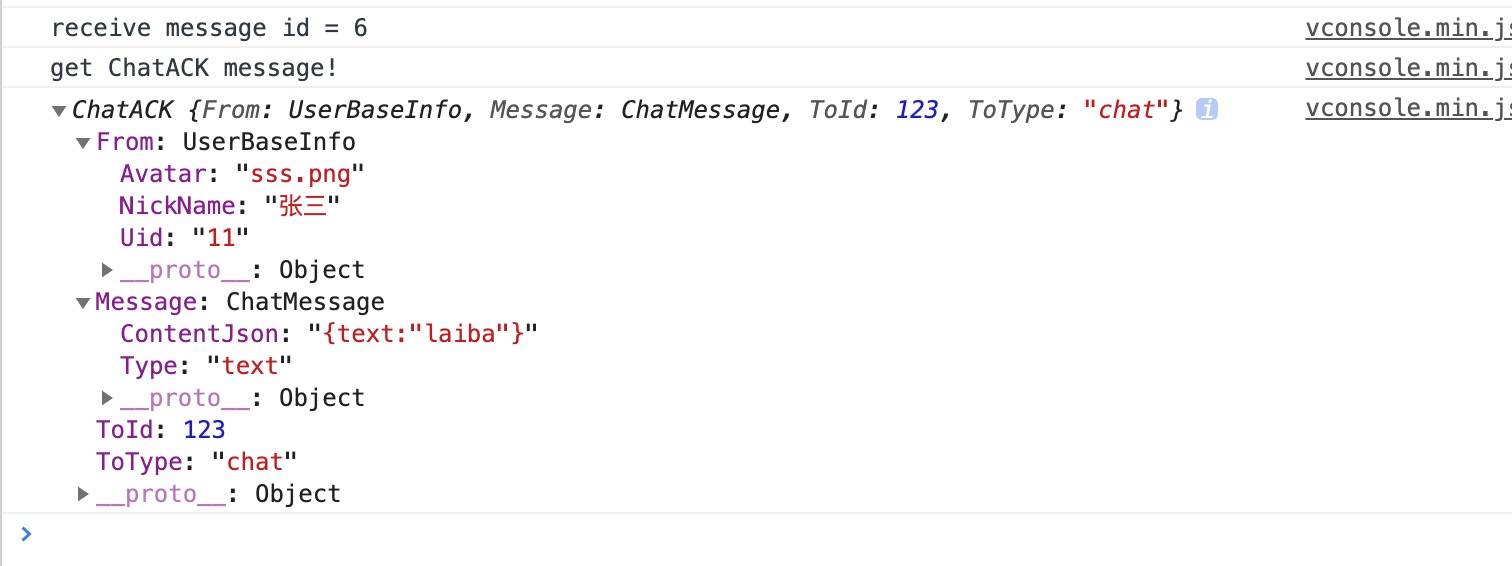
console.log("get ChatACK message!");
let message = msg.ChatACK.decode(data);
console.log(message);
}

效果

1111

功能列表

  • 微信登录获取用户信息
    • 获取token
  • websocket长连接
    • arraybuffer消息互通
    • 断线重连
  • websocket聊天
    • 消息的发送
      • 服务端的广播(ChatACK)
      • 客户端的发送(ChatREQ)
        • 发送Test
        • ui点击发送
    • 消息的接收
      • 服务端的接收(ChatREQ)
      • 客户端的接收(ChatACK)
        • 接收Test
        • ui展示接收信息
  • websocket发送玩法指令
    • 指令的发送
      • 服务端指令的广播(FireACK)
      • 客户端的发送(FireREQ)
        • 发送Test
        • ui点击发送
    • [x]指令的接收
      • 服务端的接收(FireREQ)
      • 客户端的接收(FireACK)
        • 接收Test
        • ui展示接收效果
    • 动画播放指令
      • 出鞘
      • 运行轨迹
      • 回收入鞘
  • 去掉一些以往的东西
    • 去除init,用start和reset作为代替
    • 去除 APP 的旧变量
    • 单例全部继承baseCompoent
  • 加上UImanager
    • 将以前的改成新的UImanager模式
  • 判断是否在四边形内
    • 怪物坐标的服务端管理
    • 判断是否在四边形内的算法
    • 击中扣减血量,每段内一次性伤害一次触发
  • 剑阵盘玩法
    • 剑属性(type)的玩法
      • 属性有自己当前的剑决定
      • 属性分5种,金木水火土
      • 带有附加属性:伤害加成,其他buff
    • 伤害的玩法
      • 路径攻击
        • 在攻击路径内的受到伤害
        • 触发条件:不同属性的组合
        • 延迟攻击:无
      • 区域攻击
        • 在攻击区域内的受到伤害
        • 触发条件:同属性的闭合组合
        • 延迟攻击:区域伤害
      • 回路攻击
        • 在攻击路径完毕后,原路返回攻击路径
        • 触发条件:同属性的非闭合组合
        • 延迟攻击:路径攻击加倍
    • 伤害结算
      • 飞剑基础攻击 + 加成攻击
      • 属性攻击(相克不叠加,克制叠加)
    • 破绽点(power)玩法【下个版本考虑】
      • 同一个关卡,所有玩家的怪物破绽点都一致
      • 一个回合后,会更新破绽点的分布(固定或者按照一定规律)
  • 伤害,特效的播放显示
    • 伤害扣血
    • 特效数字
  • 每个回合,更新怪物坐标
    • 如果怪物坐标大于最低点,更新关卡
  • 10个关卡
  • point连线

2.21

1、完成数据的双向绑定的研究

2.22

1、完成 特效数字 ,bmfont的插件使用
2、血量减少的bug

2.23

2.24

1、回路攻击
2、属性分5种,金木水火土
3、每个回合,更新怪物坐标

2.25

3.1

1
在assets/Script/protocol/lobby.proto下定义结构
1
protoc --php_out=./ *.proto
1
2
rm -rf ~/website/my/xianjian_pro/xianjian.jk-kj.com/Proto/GPBMetadata
mv -i GPBMetadata ~/website/my/xianjian_pro/xianjian.jk-kj.com/Proto/
1
2
rm -rf ~/website/my/xianjian_pro/xianjian.jk-kj.com/Proto/Msg
mv -i Msg/ ~/website/my/xianjian_pro/xianjian.jk-kj.com/Proto/
1
2
rm -rf ~/website/my/xianjian_pro/xianjian.jk-kj.com/Proto/Goodsmsg/
mv -i Goodsmsg/ ~/website/my/xianjian_pro/xianjian.jk-kj.com/Proto/
1
pbjs -t static-module -w commonjs -o protocol.js lobby.proto
1
pbjs -t static-module -w commonjs -o goods.js goods.proto
1
2
// var $protobuf = require("protobufjs/minimal");
var $protobuf = window.protobuf;
1
pbts -o protocol.d.ts protocol.js
1
pbts -o goods.d.ts goods.js
sequenceDiagram
        Alice->>Bob: Hello Bob, how are you?
        alt is sick
            Bob->>Alice: Not so good :(
        else is well
            Bob->>Alice: Feeling fresh like a daisy
        end

        opt Extra response
            Bob->>Alice: Thanks for asking
        end

攻击

sequenceDiagram
        用户->>服务器:获取当前房间内的怪物分布EnemysDataREQ(9)
        服务器->>用户:EnemysDataACK(10)

        opt Extra response
            服务器->>用户: Thanks for asking
        end

6.20

说明

因为客户特殊,只能给了80端口且不随便给开二级域名
只能在同一个域名下开一个路径做本地服务的代理入口

主无服务,端口:80

1
2
3
4
5
6
7
8
9
10
11
12
13
14
15
16
17
18
19
20
21
22
23
24
25
26
27
28
29
server {
listen 80;
listen 443 ssl;
server_name example.com;
root /var/www/html;
index index.php index.html;

location / {
if ( !-e $request_filename ){
rewrite ^(.*)$ /index.php?s=$1 last;
break;
}
}

## 代理本地服务
## 问题出在这个位置(下文有正确的配置)
location /proxy/ {
proxy_pass https://localhost:8144/;
}


location ~ \.php$ {
fastcgi_pass 127.0.0.1:9000;
fastcgi_index index.php;
fastcgi_param SCRIPT_FILENAME /$document_root$fastcgi_script_name;
include fastcgi_params;
}
}

辅助服务,端口:8144

1
2
3
4
5
6
7
8
9
10
11
12
13
14
15
16
17
18
19
20
server {
listen 8144;
server_name localhost;
root /var/www/tools;
index index.php index.html;

location / {
if ( !-e $request_filename ){
rewrite ^(.*)$ /index.php?s=$1 last;
break;
}
}

location ~ \.php$ {
fastcgi_pass 127.0.0.1:9000;
fastcgi_index index.php;
fastcgi_param SCRIPT_FILENAME /$document_root$fastcgi_script_name;
include fastcgi_params;
}
}

如上配置
会出现一下情况

  • 1、静态资源能正常访问,如:example.com/proxy/test.txt
  • 2、php文件,在example.com/test.php能访问,但是example.com/proxy/test.php会出现404
  • 3、本地 curl example.com/proxy/test.php 能访问

也就是 通过nginx访问example.com/proxy/test.php时,实际没有走 代理。匹配到了下面的 location ~ .php$ 了

通过查阅 nginx 的语法

1
2
3
4
5
6
7
8
9
10
11
12
13
14
15
= 开头表示精确匹配

^~ 开头表示uri以某个常规字符串开头,理解为匹配 url路径即可。nginx不对url做编码,因此请求为/static/20%/aa,可以被规则^~ /static/ /aa匹配到(注意是空格)。

~ 开头表示区分大小写的正则匹配

~* 开头表示不区分大小写的正则匹配

!~和!~*分别为区分大小写不匹配及不区分大小写不匹配 的正则

/ 通用匹配,任何请求都会匹配到。

多个location配置的情况下匹配顺序为(参考资料而来,还未实际验证):

首先匹配 =,其次匹配^~, 其次是按文件中顺序的正则匹配,最后是交给 / 通用匹配。当有匹配成功时候,停止匹配,按当前匹配规则处理请求。

例子,有如下匹配规则:

1
2
3
4
5
6
7
8
9
10
11
12
13
14
15
16
17
18
19
20
21
22
23
24
25
26
27
28
29
30
31
32
33
34
35
36
37
38
39
40
41
42
43
44
45
46
47
48

location = / {精确匹配,必须是127.0.0.1/

规则A

}

location = /login {精确匹配,必须是127.0.0.1/login

规则B

}

location ^~ /static/ {非精确匹配,并且不区分大小写,比如127.0.0.1/static/js.

规则C

}

location ~ \.(gif|jpg|png|js|css)$ {区分大小写,以gif,jpg,js结尾

规则D

}

location ~* \.png$ {不区分大小写,匹配.png结尾的

规则E

}

location !~ \.xhtml$ {区分大小写,匹配不已.xhtml结尾的

规则F

}

location !~* \.xhtml$ {

规则G

}

location / {什么都可以

规则H

}

那么产生的效果如下:

访问根目录/, 比如http://localhost/ 将匹配规则A

访问 http://localhost/login 将匹配规则B,http://localhost/register 则匹配规则H

访问 http://localhost/static/a.html 将匹配规则C

访问 http://localhost/a.gif, http://localhost/b.jpg 将匹配规则D和规则E,但是规则D顺序优先,规则E不起作用, 而 http://localhost/static/c.png 则优先匹配到 规则C

访问 http://localhost/a.PNG 则匹配规则E, 而不会匹配规则D,因为规则E不区分大小写。

访问 http://localhost/a.xhtml 不会匹配规则F和规则G,http://localhost/a.XHTML不会匹配规则G,因为不区分大小写。规则F,规则G属于排除法,符合匹配规则但是不会匹配到,所以想想看实际应用中哪里会用到。

访问 http://localhost/category/id/1111 则最终匹配到规则H,因为以上规则都不匹配,这个时候应该是nginx转发请求给后端应用服务器,比如FastCGI(php),tomcat(jsp),nginx作为方向代理服务器存在。

所以最上面的配置应该是

1
2
3
4
5
6
7
8
9
10
11
12
13
14
15
16
17
18
19
20
21
22
23
24
25
26
27
28
29
server {
listen 80;
listen 443 ssl;
server_name example.com;
root /var/www/html;
index index.php index.html;

location / {
if ( !-e $request_filename ){
rewrite ^(.*)$ /index.php?s=$1 last;
break;
}
}

## 代理本地服务
## 前面加上 ^~ 这样就不会将代理的php匹配到当前的php反向代理了
location ^~ /proxy/ {
proxy_pass https://localhost:8144/;
}


location ~ \.php$ {
fastcgi_pass 127.0.0.1:9000;
fastcgi_index index.php;
fastcgi_param SCRIPT_FILENAME /$document_root$fastcgi_script_name;
include fastcgi_params;
}
}

参考资料

详解 nginx location ~ .*.(js|css)?$ 什么意思?

说明

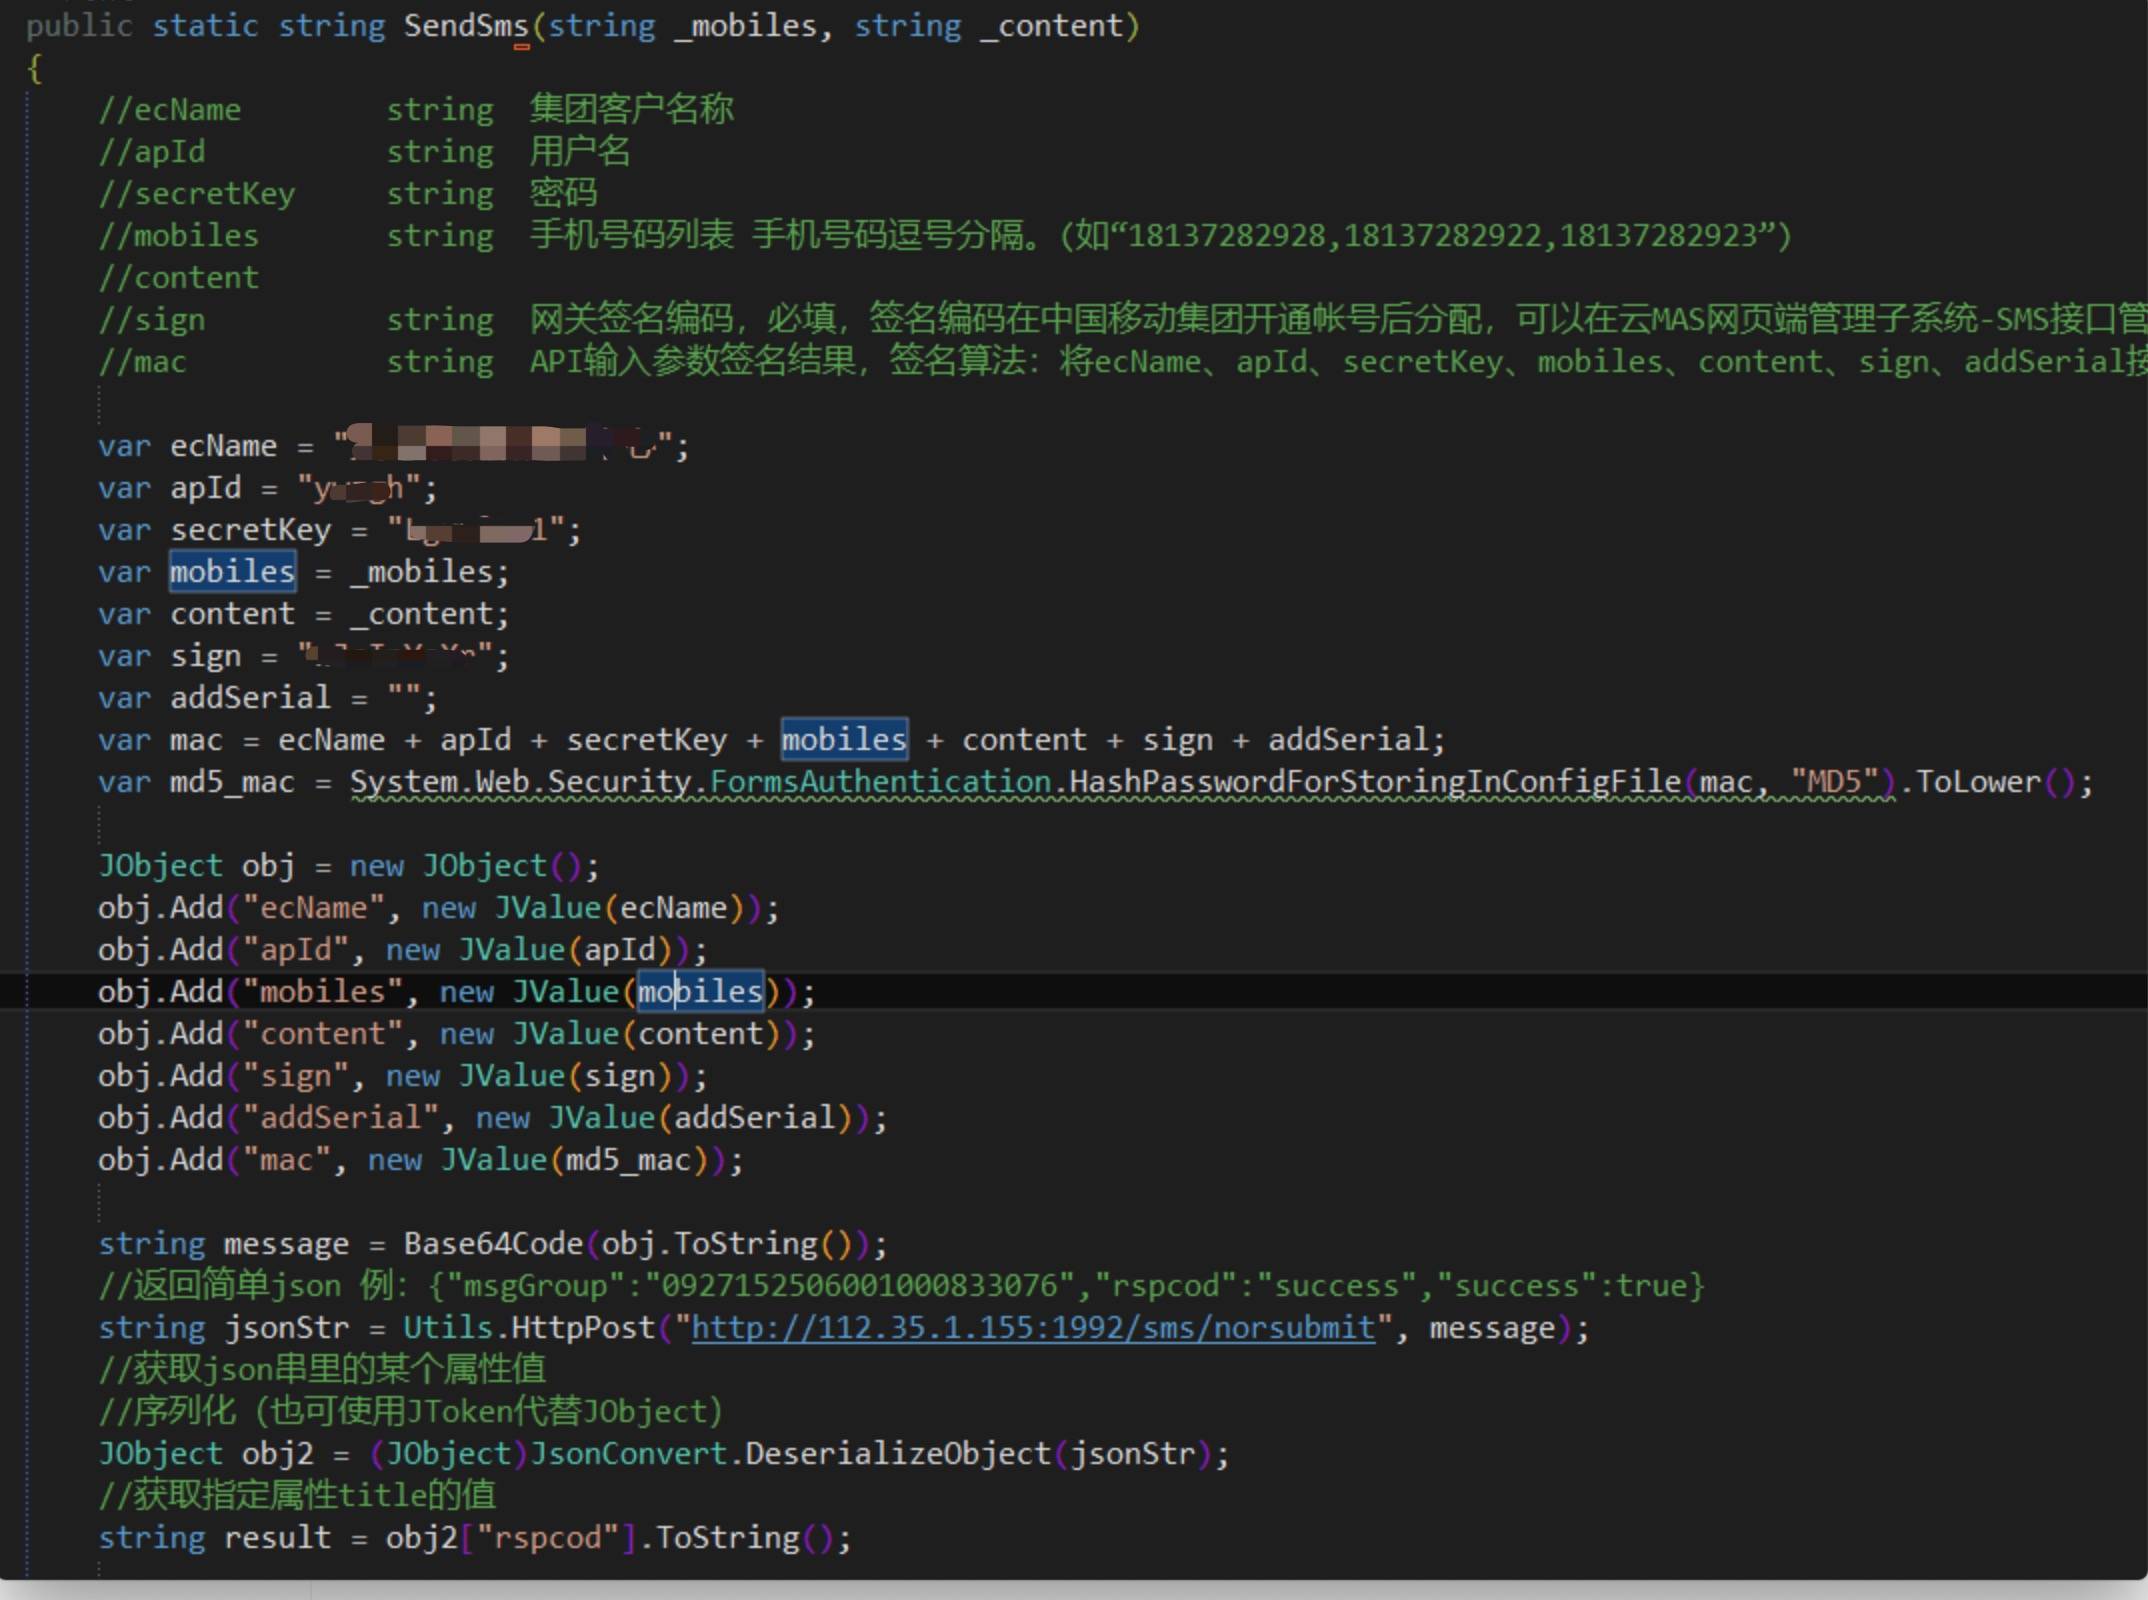
对接移动短信发送的sdk,官方是java版本的。
现在用自己熟悉的php和新学的go来实现一遍,看看go的实现有和不同

官方java版本的demo

demoforjava

php实现

1
2
3
4
5
6
7
8
9
10
11
12
13
14
15
16
17
18
19
20
21
22
23
24
25
26
27
28
29
30
31
32
33
34
35
36
public function sendsms(){

$url = 'http://112.35.1.155:1992/sms/norsubmit';
$client = new HttpClient($url);

$ecName = "管理中心";
$apId = "xxx";
$secretKey = "L00001";
$mobiles = "136****00";
$content = "移动改变生活";
$sign = "xcxxcxcxc";
$addSerial = "";
$mac_origin = $ecName.$apId.$secretKey.$mobiles.$content.$sign.$addSerial;

$mac = strtolower(md5($mac_origin));

$object = new \stdClass();
$object->ecName = $ecName;
$object->apId = $apId;
$object->secretKey = $secretKey;
$object->mobiles = $mobiles;
$object->content = $content;
$object->sign = $sign;
$object->addSerial = $addSerial;
$object->mac = $mac;

$json = json_encode($object,JSON_FORCE_OBJECT);

$message = base64_encode($json);

$client->setContentType("application/json; charset=UTF-8");
$response = $client->post($message);

var_dump($response);
}

go的实现

1
2
3
4
5
6
7
8
9
10
11
12
13
14
15
16
17
18
19
20
21
22
23
24
25
26
27
28
29
30
31
32
33
34
35
36
37
38
39
40
41
42
43
44
45
46
47
48
49
50
51
52
53
54
55
56
57
58
59
60
61
62
63
64
65
66
67
68
69
70
71
72
73
74
75
76
77
78
79
80
81
82
83
84
85
86
87
88
89
package main

import (
"fmt"
"strings"
"net/http"
"io/ioutil"
"crypto/md5"
"encoding/hex"
"encoding/json"
"encoding/base64"
// "reflect"
)

type Object struct{
EcName string `json:"ecName"`
ApId string `json:"apId"`
SecretKey string `json:"secretKey"`
Mobiles string `json:"mobiles"`
Content string `json:"content"`
Sign string `json:"sign"`
AddSerial string `json:"addserial"`
Mac string `json:"mac"`
}

func mkmd5(s string) string {
md5Ctx := md5.New()
md5Ctx.Write([]byte(s))
cipherStr := md5Ctx.Sum(nil)
return hex.EncodeToString(cipherStr)
}

func main() {
client := &http.Client{}
posturl := "http://112.35.1.155:1992/sms/norsubmit"

ecName := "管理中心";
apId := "xxx";
secretKey := "L00001";
mobiles := "136****00";
content := "移动改变生活";
sign := "xcxxcxcxc";
addSerial := "";
mac_origin := ecName + apId + secretKey + mobiles + content + sign + addSerial;

mac := mkmd5(mac_origin)

object := Object{
EcName: ecName,
ApId:apId,
SecretKey:secretKey,
Mobiles:mobiles,
Content:content,
Sign:sign,
AddSerial:addSerial,
Mac:mac,
}

sdata, err := json.Marshal(object)
fmt.Println(sdata)
// fmt.Println("sdata 的数据类型是:",reflect.TypeOf(sdata))

if err != nil {
fmt.Println("json.marshal failed, err:", err)
return
}

// json_string := string(sdata)
// fmt.Println(json_string)

message := base64.StdEncoding.EncodeToString(sdata)

req, err := http.NewRequest("POST", posturl, strings.NewReader(message))
if err != nil {
// handle error
}

req.Header.Set("Content-Type", "application/json")

resp, err := client.Do(req)
defer resp.Body.Close()

body, err := ioutil.ReadAll(resp.Body)
if err != nil {
// handle error
}
fmt.Println(string(body))
}

主要的不同

  • md5的方法需要自己去封装下使用
  • json.Marshal返回的是 []uint8,需要自己再转格式
  • go语音在使用类似php中的函数时,必须自己清楚需要用到哪些包

存在的坑

  • golang中struct变量JSON转码变量名必须大写

参考

Golang计算MD5

golang中struct变量JSON转码变量名必须大写

golang实现base64编解码

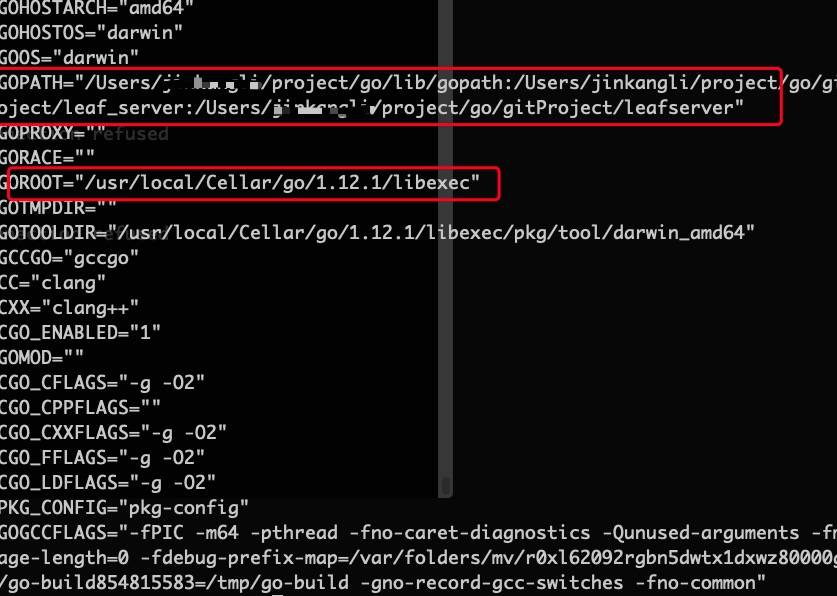
首先使用go env查看当前环境变量,新手入门出现找不到包的情况大多是环境环境的问题。只需要关注GOROOT和GOPATH即可。

  • GOROOT:简单来说就是GO的安装目录,这个影响不大。
  • GOPATH:表示GO的工作目录,出现找不到包的情况大概率就是这里出了问题。

112233

Golang 的代码必须放置在一个 workspace 中。一个 workspace 是一个目录,此目录中包含几个子目录:

  • src 目录。包含源文件,源文件被组织为包(一个目录一个包)
  • pkg 目录。包含包目标文件(package objects)
  • bin 目录。包含可执行的命令

包源文件(package source)被编译为包目标文件(package object),命令源文件(command source)被编译为可执行命令(command executable)。使用 go 命令进行构建生成的包目标文件位于 pkg 目录中,生成的可执行命令位于 bin 目录中。开发 Golang 需要设置一个环境变量 GOPATH,此环境变量用于指定 workspace 的路径,另外,也可以把 workspace 的 bin 目录加入到 PATH 环境变量中去。

一般一些临时的go项目,我们会 临时用如下,进行添加

1
export GOPATH=$GOPATH:/Users/xxxx/go/leafserver

cocos creater 的protobuf接收和处理消息:

获取protobufjs

1
npm install protobufjs

找到下载的protobuf.js

path: /usr/local/lib/node_modules/protobufjs/dist

将protobuf.js拖到creator工程中并导入为插件

1.proto编译成静态文件:
把msg.proto 复制到client文件夹下,把proto文件编译成静态文件使用:

1
2
pbjs -t static-module -w commonjs -o msg.js msg.proto
pbts -o msg.d.ts msg.js

把msg.js 和msg.d.ts拷贝到cocos项目中的 assets\script\protocol文件夹中

说明

本文档按照实验楼–Go 并发服务器框架 Zinx 入门的文档同步学习记录(大部分内容相同)
https://www.lanqiao.cn/courses/1639
主要有以下原因:
1、模仿大神写教程的风格
2、验证每一个步骤,而不是简简单单的复制教程中的代码。简单重现

实验介绍

本节我们将实现 zinx 最终的功能,链接属性配置。
00

知识点

链接配置

准备工作

现在当我们在使用链接处理的时候,希望和链接绑定一些用户的数据,或者参数。那么我们现在可以把当前链接设定一些传递参数的接口或者方法。

给链接添加链接配置接口

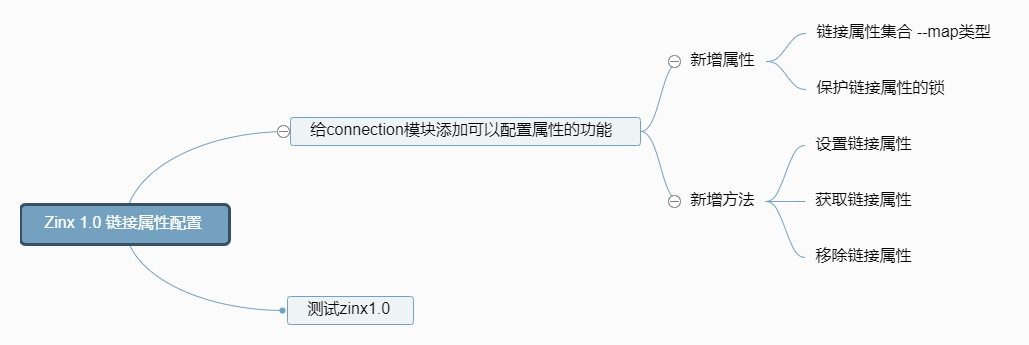
我们需要在 IConnection 接口中添加三个方法,分别对应我们开篇图片中对应的三个功能:
zinx/ziface/iconnection.go

1
2
3
4
5
6
//设置链接属性
SetProperty(key string, value interface{})
//获取链接属性
GetProperty(key string)(interface{}, error)
//移除链接属性
RemoveProperty(key string)

这里增添了 3 个方法SetProperty(),GetProperty(),RemoveProperty().那么 property 是什么类型的呢,我么接下来看看 Connection 的定义。

链接属性方法实现

这里,我们需要定义 property 的类型,其实是很容易想到的,他应该是一个集合类型,因为链接属性应该是唯一的。同时,我们为了保护链接属性的并发安全性能,还需要对其加上一个锁,所以,修正后的代码如下:
zinx/znet/connction.go

1
2
3
4
5
6
7
8
9
10
11
12
13
14
15
16
17
18
19
20
21
22
23
24
25
26
27
28
29
30
31
32
33
34
35
36
37
38
39
40
41
42
43
44
45
46
47
48
49
50
51
52
53
54
55
56
57
58
59
60
61
62
63
64
65
66
67
// 这里我们引入了锁操作,所以在 import 部分里我们还需要将 "sync" 引入进来
// 和之前一样,//... 表示剩余代码不需要修改。
type Connection struct {
//当前Conn属于哪个Server
TcpServer ziface.IServer
//当前连接的socket TCP套接字
Conn *net.TCPConn
//当前连接的ID 也可以称作为SessionID,ID全局唯一
ConnID uint32
//当前连接的关闭状态
isClosed bool
//消息管理MsgId和对应处理方法的消息管理模块
MsgHandler ziface.IMsgHandle
//告知该链接已经退出/停止的channel
ExitBuffChan chan bool
//无缓冲管道,用于读、写两个goroutine之间的消息通信
msgChan chan []byte
//有关冲管道,用于读、写两个goroutine之间的消息通信
msgBuffChan chan []byte
// ================================
//链接属性
property map[string]interface{}
//保护链接属性修改的锁
propertyLock sync.RWMutex
// ================================
}
//创建连接的方法
func NewConntion(server ziface.IServer, conn *net.TCPConn, connID uint32, msgHandler ziface.IMsgHandle) *Connection {
//初始化Conn属性
c := &Connection{
TcpServer: server,
Conn: conn,
ConnID: connID,
isClosed: false,
MsgHandler: msgHandler,
ExitBuffChan: make(chan bool, 1),
msgChan: make(chan []byte),
msgBuffChan: make(chan []byte, utils.GlobalObject.MaxMsgChanLen),
property: make(map[string]interface{}), //对链接属性map初始化
}
//将新创建的Conn添加到链接管理中
c.TcpServer.GetConnMgr().Add(c)
return c
}
// ...
//设置链接属性
func (c *Connection) SetProperty(key string, value interface{}) {
c.propertyLock.Lock()
defer c.propertyLock.Unlock()
c.property[key] = value
}
//获取链接属性
func (c *Connection) GetProperty(key string) (interface{}, error) {
c.propertyLock.RLock()
defer c.propertyLock.RUnlock()
if value, ok := c.property[key]; ok {
return value, nil
} else {
return nil, errors.New("no property found")
}
}
//移除链接属性
func (c *Connection) RemoveProperty(key string) {
c.propertyLock.Lock()
defer c.propertyLock.Unlock()
delete(c.property, key)
}

测试

到这里,我们 zinx 框架的全部功能就完成了。现在我们来测试一下链接属性的设置与提取是否可用:

Server.go:

1
2
3
4
5
6
7
8
9
10
11
12
13
14
15
16
17
18
19
20
21
22
23
24
25
26
27
28
29
30
31
32
33
34
35
36
37
38
39
40
41
42
43
44
45
46
47
48
49
50
51
52
53
54
55
56
57
58
59
60
61
62
63
64
65
66
67
68
69
70
package main
import (
"fmt"
"zinx/ziface"
"zinx/znet"
)
//ping test 自定义路由
type PingRouter struct {
znet.BaseRouter
}
//Ping Handle
func (this *PingRouter) Handle(request ziface.IRequest) {
fmt.Println("Call PingRouter Handle")
//先读取客户端的数据,再回写ping...ping...ping
fmt.Println("recv from client : msgId=", request.GetMsgID(), ", data=", string(request.GetData()))
err := request.GetConnection().SendBuffMsg(0, []byte("ping...ping...ping"))
if err != nil {
fmt.Println(err)
}
}
type HelloZinxRouter struct {
znet.BaseRouter
}
//HelloZinxRouter Handle
func (this *HelloZinxRouter) Handle(request ziface.IRequest) {
fmt.Println("Call HelloZinxRouter Handle")
//先读取客户端的数据,再回写ping...ping...ping
fmt.Println("recv from client : msgId=", request.GetMsgID(), ", data=", string(request.GetData()))
err := request.GetConnection().SendBuffMsg(1, []byte("Hello Zinx Router V0.10"))
if err != nil {
fmt.Println(err)
}
}
//创建连接的时候执行
func DoConnectionBegin(conn ziface.IConnection) {
fmt.Println("DoConnecionBegin is Called ... ")
//=============设置两个链接属性,在连接创建之后===========
fmt.Println("Set conn Name, Home done!")
conn.SetProperty("Name", "Aceld")
conn.SetProperty("Home", "https://www.lanqiao.cn/courses/1639/")
//===================================================
err := conn.SendMsg(2, []byte("DoConnection BEGIN..."))
if err != nil {
fmt.Println(err)
}
}
//连接断开的时候执行
func DoConnectionLost(conn ziface.IConnection) {
//============在连接销毁之前,查询conn的Name,Home属性=====
if name, err:= conn.GetProperty("Name"); err == nil {
fmt.Println("Conn Property Name = ", name)
}
if home, err := conn.GetProperty("Home"); err == nil {
fmt.Println("Conn Property Home = ", home)
}
//===================================================
fmt.Println("DoConneciotnLost is Called ... ")
}
func main() {
//创建一个server句柄
s := znet.NewServer()
//注册链接hook回调函数
s.SetOnConnStart(DoConnectionBegin)
s.SetOnConnStop(DoConnectionLost)
//配置路由
s.AddRouter(0, &PingRouter{})
s.AddRouter(1, &HelloZinxRouter{})
//开启服务
s.Serve()
}

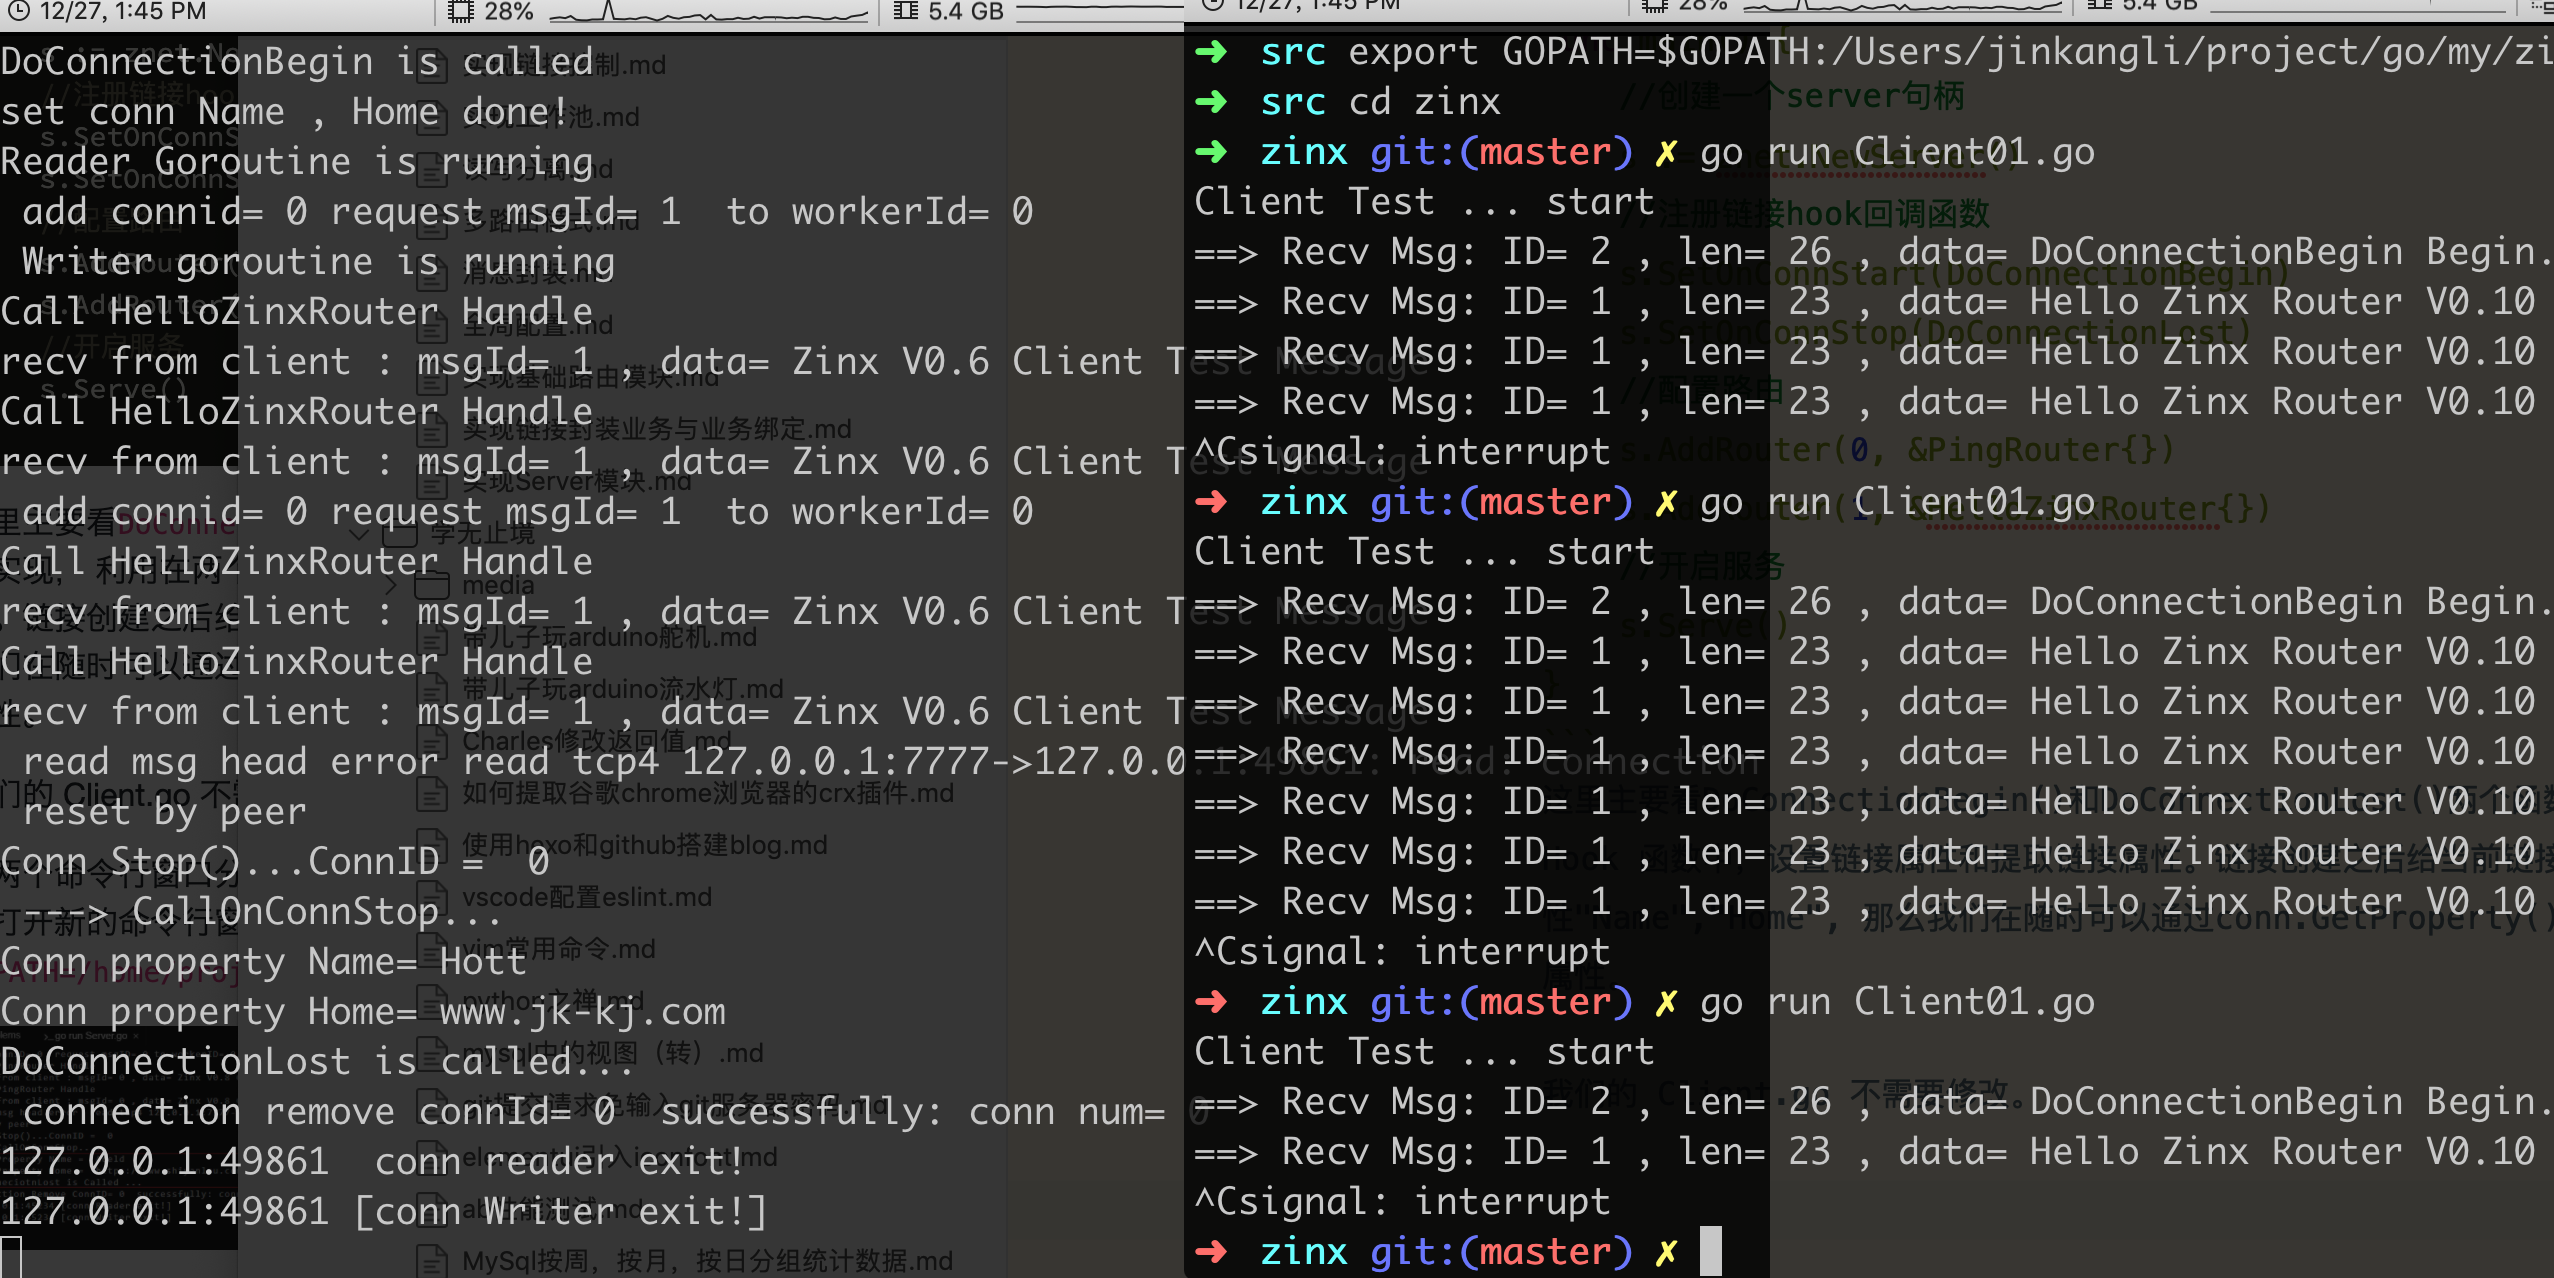
这里主要看DoConnectionBegin()和DoConnectionLost()两个函数的实现, 利用在两个 Hook 函数中,设置链接属性和提取链接属性。链接创建之后给当前链接绑定两个属性”Name”,”Home”, 那么我们在随时可以通过conn.GetProperty()方法得到链接已经设置的属性。

我们的 Client.go 不需要修改。

pp

当我们终止客户端链接,那么服务端在断开链接之前,已经读取到了 conn 的两个属性 Name 和 Home。说明我们的代码达到了预期效果,可以对链接属性进行控制了。

说明

本文档按照实验楼–Go 并发服务器框架 Zinx 入门的文档同步学习记录(大部分内容相同)
https://www.lanqiao.cn/courses/1639
主要有以下原因:
1、模仿大神写教程的风格
2、验证每一个步骤,而不是简简单单的复制教程中的代码。简单重现

实验介绍

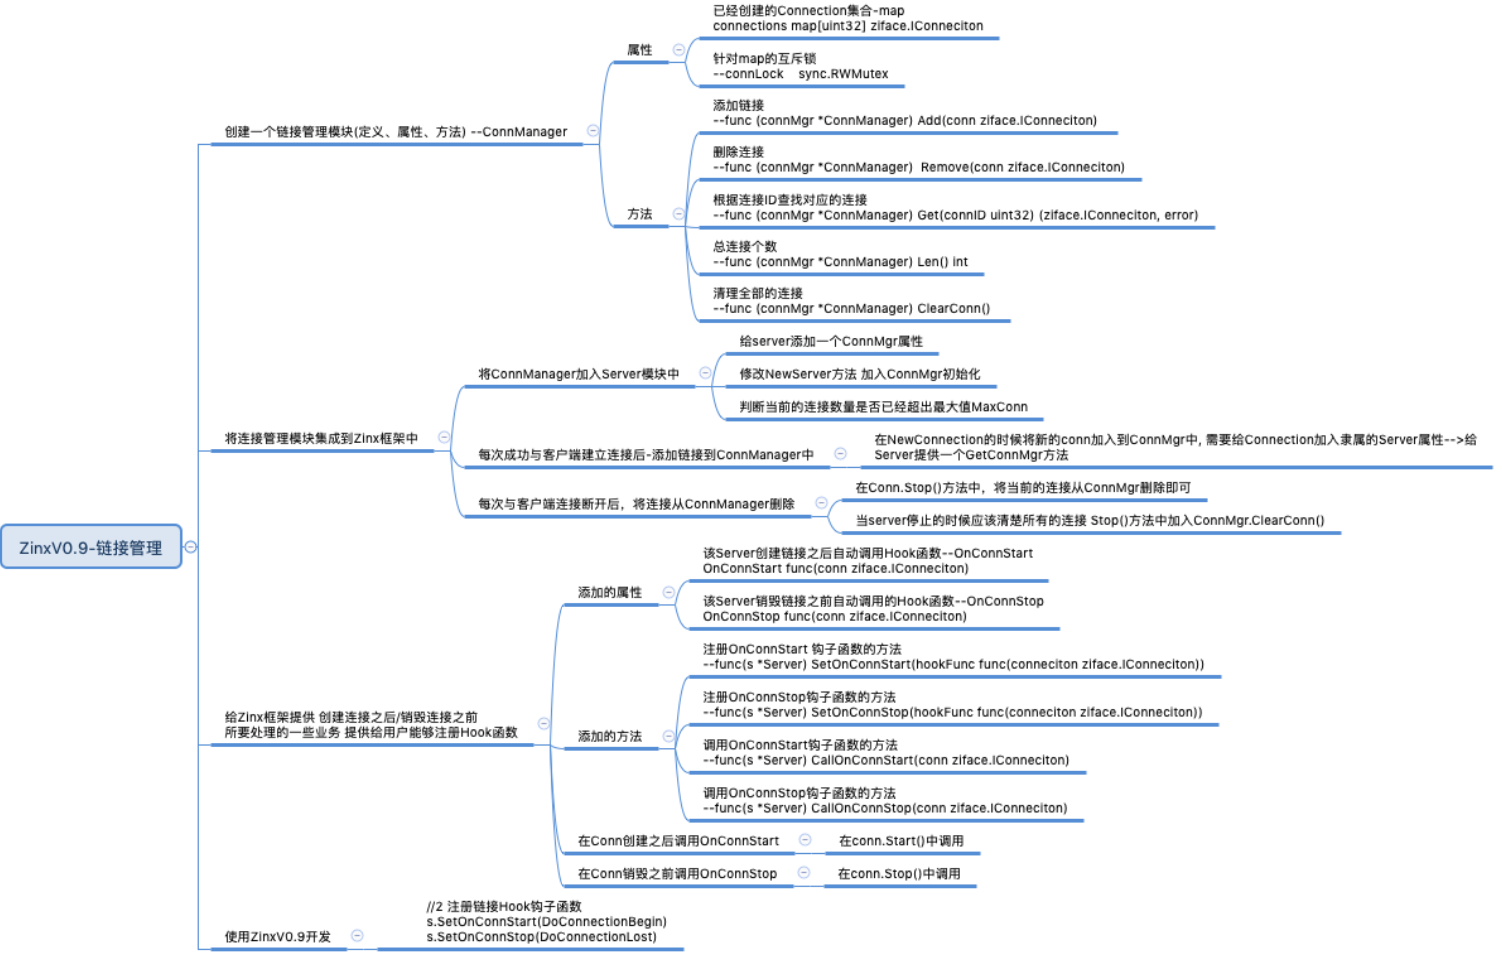
我们现在就需要给 Zinx 添加链接管理机制了。
之前我们已经实现了让 zinx 可以处理多链接请求,现在我们要为 Zinx 框架增加链接个数的限定,如果超过一定量的客户端个数,Zinx 为了保证后端的及时响应,而拒绝链接请求。
99

知识点

  • 链接管理
  • 数量限制

创建链接管理模块

这里面我们就需要对链接有一个管理的模块。

我们在 ziface 和 znet 分别建立 iconnmanager.go 和 connmanager.go 文件。

zinx/ziface/iconmanager.go

1
2
3
4
5
6
7
8
9
10
11
package ziface
/*
连接管理抽象层
*/
type IConnManager interface {
Add(conn IConnection) //添加链接
Remove(conn IConnection) //删除连接
Get(connID uint32) (IConnection, error) //利用ConnID获取链接
Len() int //获取当前连接
ClearConn() //删除并停止所有链接
}

这里定义了一些接口方法,添加链接、删除链接、根据 ID 获取链接、链接数量、和清除链接等。下面我们对这个接口进行实现。

这里面 ConnManager 中,其中用一个 map 来承载全部的连接信息,key 是连接 ID,value 则是连接本身。其中有一个读写锁 connLock 主要是针对 map 做多任务修改时的保护作用。

Remove() 方法只是单纯的将 conn 从 map 中摘掉,而 ClearConn() 方法则会先停止链接业务,c.Stop(),然后再从 map 中摘除。

zinx/znet/connmanager.go

1
2
3
4
5
6
7
8
9
10
11
12
13
14
15
16
17
18
19
20
21
22
23
24
25
26
27
28
29
30
31
32
33
34
35
36
37
38
39
40
41
42
43
44
45
46
47
48
49
50
51
52
53
54
55
56
57
58
59
60
61
62
63
64
65
66
67
68
69
package znet
import (
"errors"
"fmt"
"sync"
"zinx/ziface"
)
/*
连接管理模块
*/
type ConnManager struct {
connections map[uint32]ziface.IConnection //管理的连接信息
connLock sync.RWMutex //读写连接的读写锁
}
/*
创建一个链接管理
*/
func NewConnManager() *ConnManager {
return &ConnManager{
connections:make(map[uint32] ziface.IConnection),
}
}
//添加链接
func (connMgr *ConnManager) Add(conn ziface.IConnection) {
//保护共享资源Map 加写锁
connMgr.connLock.Lock()
defer connMgr.connLock.Unlock()
//将conn连接添加到ConnMananger中
connMgr.connections[conn.GetConnID()] = conn
fmt.Println("connection add to ConnManager successfully: conn num = ", connMgr.Len())
}
//删除连接
func (connMgr *ConnManager) Remove(conn ziface.IConnection) {
//保护共享资源Map 加写锁
connMgr.connLock.Lock()
defer connMgr.connLock.Unlock()
//删除连接信息
delete(connMgr.connections, conn.GetConnID())
fmt.Println("connection Remove ConnID=",conn.GetConnID(), " successfully: conn num = ", connMgr.Len())
}
//利用ConnID获取链接
func (connMgr *ConnManager) Get(connID uint32) (ziface.IConnection, error) {
//保护共享资源Map 加读锁
connMgr.connLock.RLock()
defer connMgr.connLock.RUnlock()
if conn, ok := connMgr.connections[connID]; ok {
return conn, nil
} else {
return nil, errors.New("connection not found")
}
}
//获取当前连接
func (connMgr *ConnManager) Len() int {
return len(connMgr.connections)
}
//清除并停止所有连接
func (connMgr *ConnManager) ClearConn() {
//保护共享资源Map 加写锁
connMgr.connLock.Lock()
defer connMgr.connLock.Unlock()
//停止并删除全部的连接信息
for connID, conn := range connMgr.connections {
//停止
conn.Stop()
//删除
delete(connMgr.connections,connID)
}
fmt.Println("Clear All Connections successfully: conn num = ", connMgr.Len())
}

链接管理模块集成到 Zinx 中

现在需要将ConnManager添加到Server中。

zinx/znet/server.go

1
2
3
4
5
6
7
8
9
10
11
12
13
14
15
16
17
18
19
20
21
22
23
24
25
26
27
28
29
30
//iServer 接口实现,定义一个Server服务类
type Server struct {
//服务器的名称
Name string
//tcp4 or other
IPVersion string
//服务绑定的IP地址
IP string
//服务绑定的端口
Port int
//当前Server的消息管理模块,用来绑定MsgId和对应的处理方法
msgHandler ziface.IMsgHandle
//当前Server的链接管理器
ConnMgr ziface.IConnManager
}
/*
创建一个服务器句柄
*/
func NewServer () ziface.IServer {
utils.GlobalObject.Reload()
s:= &Server {
Name :utils.GlobalObject.Name,
IPVersion:"tcp4",
IP:utils.GlobalObject.Host,
Port:utils.GlobalObject.TcpPort,
msgHandler: NewMsgHandle(),
ConnMgr:NewConnManager(), //创建ConnManager
}
return s
}

现在,既然 server 具备了 ConnManager 成员,在获取的时候需要给抽象层提供一个获取 ConnManager 方法 。

zinx/ziface/iserver.go

1
2
3
4
5
6
7
8
9
10
11
12
type IServer interface{
//启动服务器方法
Start()
//停止服务器方法
Stop()
//开启业务服务方法
Serve()
//路由功能:给当前服务注册一个路由业务方法,供客户端链接处理使用
AddRouter(msgId uint32, router IRouter)
//得到链接管理
GetConnMgr() IConnManager
}

zinx/znet/server.go

1
2
3
4
//得到链接管理
func (s *Server) GetConnMgr() ziface.IConnManager {
return s.ConnMgr
}

因为我们现在在 server 中有链接的管理,有的时候 conn 也需要得到这个 ConnMgr 的使用权,那么我们需要将Server和Connection建立能够互相索引的关系,我们在Connection中,添加 Server 当前 conn 隶属的 server 句柄。

zinx/znet/connection.go

1
2
3
4
5
6
7
8
9
10
11
12
13
14
15
16
17
18
type Connection struct {
//当前Conn属于哪个Server
TcpServer ziface.IServer //当前conn属于哪个server,在conn初始化的时候添加即可
//当前连接的socket TCP套接字
Conn *net.TCPConn
//当前连接的ID 也可以称作为SessionID,ID全局唯一
ConnID uint32
//当前连接的关闭状态
isClosed bool
//消息管理MsgId和对应处理方法的消息管理模块
MsgHandler ziface.IMsgHandle
//告知该链接已经退出/停止的channel
ExitBuffChan chan bool
//无缓冲管道,用于读、写两个goroutine之间的消息通信
msgChan chan []byte
//有关冲管道,用于读、写两个goroutine之间的消息通信
msgBuffChan chan []byte
}

链接的添加

现在我们怎么样选择将创建好的连接添加到ConnManager中呢,这里我们选择在初始化一个新链接的时候,加进来就好了。

zinx/znet/connection.go

1
2
3
4
5
6
7
8
9
10
11
12
13
14
15
16
17
//创建连接的方法
func NewConntion(server ziface.IServer, conn *net.TCPConn, connID uint32, msgHandler ziface.IMsgHandle) *Connection{
//初始化Conn属性
c := &Connection{
TcpServer:server, //将隶属的server传递进来
Conn: conn,
ConnID: connID,
isClosed: false,
MsgHandler: msgHandler,
ExitBuffChan: make(chan bool, 1),
msgChan:make(chan []byte),
msgBuffChan:make(chan []byte, utils.GlobalObject.MaxMsgChanLen),
}
//将新创建的Conn添加到链接管理中
c.TcpServer.GetConnMgr().Add(c) //将当前新创建的连接添加到ConnManager中
return c
}

Server 中添加链接数量的判断

在 server 的Start()方法中,在 Accept 与客户端链接建立成功后,可以直接对链接的个数做一个判断。

zinx/znet/server.go

1
2
3
4
5
6
7
8
9
10
11
12
13
14
15
16
17
18
19
20
21
22
23
24
25
26
27
28
29
30
31
32
33
34
//开启网络服务
// 注意 // ... 的部分是对应的原来的代码不需要变动
func (s *Server) Start() {
fmt.Printf("[START] Server name: %s,listenner at IP: %s, Port %d is starting\n", s.Name, s.IP, s.Port)
fmt.Printf("[Zinx] Version: %s, MaxConn: %d, MaxPacketSize: %d\n",
utils.GlobalObject.Version,
utils.GlobalObject.MaxConn,
utils.GlobalObject.MaxPacketSize)
//开启一个go去做服务端Linster业务
go func() {
// ....
//3 启动server网络连接业务
for {
//3.1 阻塞等待客户端建立连接请求
conn, err := listenner.AcceptTCP()
if err != nil {
fmt.Println("Accept err ", err)
continue
}
//=============
//3.2 设置服务器最大连接控制,如果超过最大连接,那么则关闭此新的连接
if s.ConnMgr.Len() >= utils.GlobalObject.MaxConn {
conn.Close()
continue
}
//=============
//3.3 处理该新连接请求的 业务 方法, 此时应该有 handler 和 conn是绑定的
dealConn := NewConntion(s, conn, cid, s.msgHandler)
cid ++
//3.4 启动当前链接的处理业务
go dealConn.Start()
}
}()
}

当然,我们应该在配置文件zinx.json或者在GlobalObject全局配置中,定义好我们期望的连接的最大数目限制MaxConn。 同时,因为这里添加了一个新的属性,所以全局配置也需要做出修改:

zinx/utils/globalobj.go

1
2
3
4
5
6
7
8
9
10
11
12
13
14
15
16
17
18
19
20
21
22
23
24
25
26
27
28
29
30
31
32
33
34
35
36
37
38
39
40
41
42
43
type GlobalObj struct {
/*
Server
*/
TcpServer ziface.IServer //当前Zinx的全局Server对象
Host string //当前服务器主机IP
TcpPort int //当前服务器主机监听端口号
Name string //当前服务器名称
/*
Zinx
*/
Version string //当前Zinx版本号
MaxPacketSize uint32 //都需数据包的最大值
MaxConn int //当前服务器主机允许的最大链接个数
WorkerPoolSize uint32 //业务工作Worker池的数量
MaxWorkerTaskLen uint32 //业务工作Worker对应负责的任务队列最大任务存储数量
MaxMsgChanLen int
/*
config file path
*/
ConfFilePath string
}

/*
提供init方法,默认加载
*/
func init() {
//初始化GlobalObject变量,设置一些默认值
GlobalObject = &GlobalObj{
Name: "ZinxServerApp",
Version: "V0.4",
TcpPort: 7777,
Host: "0.0.0.0",
MaxConn: 12000,
MaxPacketSize: 4096,
ConfFilePath: "conf/zinx.json",
WorkerPoolSize: 10,
MaxWorkerTaskLen: 1024,
MaxMsgChanLen: 16,
}
//从配置文件中加载一些用户配置的参数
GlobalObject.Reload()
}

连接的删除

我们应该在连接停止的时候,将该连接从 ConnManager 中删除,所以在connection的Stop()方法中添加。

zinx/znet/connecion.go

1
2
3
4
5
6
7
8
9
10
11
12
13
14
15
16
17
func (c *Connection) Stop() {
fmt.Println("Conn Stop()...ConnID = ", c.ConnID)
//如果当前链接已经关闭
if c.isClosed == true {
return
}
c.isClosed = true
// 关闭socket链接
c.Conn.Close()
//关闭Writer Goroutine
c.ExitBuffChan <- true
//将链接从连接管理器中删除
c.TcpServer.GetConnMgr().Remove(c) //删除conn从ConnManager中
//关闭该链接全部管道
close(c.ExitBuffChan)
close(c.msgBuffChan)
}

当然,我们也应该在server停止的时候,将全部的连接清空。

zinx/znet/server.go

1
2
3
4
5
func (s *Server) Stop() {
fmt.Println("[STOP] Zinx server , name " , s.Name)
//将其他需要清理的连接信息或者其他信息 也要一并停止或者清理
s.ConnMgr.ClearConn()
}

现在我们已经将连接管理成功的集成到了 Zinx 之中了。 下面我们接着实现带缓冲的发包方法。

链接的带缓冲的发包方法

我们之前给Connection提供了一个发消息的方法SendMsg(),这个是将数据发送到一个无缓冲的 channel 中msgChan。但是如果客户端链接比较多的话,如果对方处理不及时,可能会出现短暂的阻塞现象,我们可以做一个提供一定缓冲的发消息方法,做一些非阻塞的发送体验。

zinx/ziface/iconnection.go

1
2
3
4
5
6
7
8
9
10
11
12
13
14
15
16
17
//定义连接接口
type IConnection interface {
//启动连接,让当前连接开始工作
Start()
//停止连接,结束当前连接状态M
Stop()
//从当前连接获取原始的socket TCPConn
GetTCPConnection() *net.TCPConn
//获取当前连接ID
GetConnID() uint32
//获取远程客户端地址信息
RemoteAddr() net.Addr
//直接将Message数据发送数据给远程的TCP客户端(无缓冲)
SendMsg(msgId uint32, data []byte) error
//直接将Message数据发送给远程的TCP客户端(有缓冲)
SendBuffMsg(msgId uint32, data []byte) error //添加带缓冲发送消息接口
}

zinx/znet/connection.go

1
2
3
4
5
6
7
8
9
10
11
12
13
14
15
16
17
18
19
20
21
22
23
24
25
26
27
28
29
30
31
32
33
34
35
type Connection struct {
//当前Conn属于哪个Server
TcpServer ziface.IServer
//当前连接的socket TCP套接字
Conn *net.TCPConn
//当前连接的ID 也可以称作为SessionID,ID全局唯一
ConnID uint32
//当前连接的关闭状态
isClosed bool
//消息管理MsgId和对应处理方法的消息管理模块
MsgHandler ziface.IMsgHandle
//告知该链接已经退出/停止的channel
ExitBuffChan chan bool
//无缓冲管道,用于读、写两个goroutine之间的消息通信
msgChan chan []byte
//有关冲管道,用于读、写两个goroutine之间的消息通信
msgBuffChan chan []byte //定义channel成员
}
//创建连接的方法
func NewConntion(server ziface.IServer, conn *net.TCPConn, connID uint32, msgHandler ziface.IMsgHandle) *Connection{
//初始化Conn属性
c := &Connection{
TcpServer:server,
Conn: conn,
ConnID: connID,
isClosed: false,
MsgHandler: msgHandler,
ExitBuffChan: make(chan bool, 1),
msgChan:make(chan []byte),
msgBuffChan:make(chan []byte, utils.GlobalObject.MaxMsgChanLen), //不要忘记初始化
}
//将新创建的Conn添加到链接管理中
c.TcpServer.GetConnMgr().Add(c)
return c
}

然后将SendBuffMsg()方法实现一下:

1
2
3
4
5
6
7
8
9
10
11
12
13
14
15
func (c *Connection) SendBuffMsg(msgId uint32, data []byte) error {
if c.isClosed == true {
return errors.New("Connection closed when send buff msg")
}
//将data封包,并且发送
dp := NewDataPack()
msg, err := dp.Pack(NewMsgPackage(msgId, data))
if err != nil {
fmt.Println("Pack error msg id = ", msgId)
return errors.New("Pack error msg ")
}
//写回客户端
c.msgBuffChan <- msg
return nil
}

我们在 Writer 中也要有对msgBuffChan的数据监控:

1
2
3
4
5
6
7
8
9
10
11
12
13
14
15
16
17
18
19
20
21
22
23
24
25
26
27
28
29
30
31
/*
写消息Goroutine, 用户将数据发送给客户端
*/
func (c *Connection) StartWriter() {
fmt.Println("[Writer Goroutine is running]")
defer fmt.Println(c.RemoteAddr().String(), "[conn Writer exit!]")
for {
select {
case data := <-c.msgChan:
//有数据要写给客户端
if _, err := c.Conn.Write(data); err != nil {
fmt.Println("Send Data error:, ", err, " Conn Writer exit")
return
}
//针对有缓冲channel需要些的数据处理
case data, ok:= <-c.msgBuffChan:
if ok {
//有数据要写给客户端
if _, err := c.Conn.Write(data); err != nil {
fmt.Println("Send Buff Data error:, ", err, " Conn Writer exit")
return
}
} else {
break
fmt.Println("msgBuffChan is Closed")
}
case <-c.ExitBuffChan:
return
}
}
}

现在,我们实现了带缓冲的发包方法。接下来,我们去实现注册链接启动/停止自定义 Hook 方法功能。

注册链接启动/停止自定义 Hook 方法功能

有的时候,在创建链接的时候,希望在创建链接之后、和断开链接之前,执行一些用户自定义的业务。那么我们就需要给 Zinx 增添两个链接创建后和断开前时机的回调函数,一般也称作 Hook(钩子)函数。

我们可以通过 Server 来注册 conn 的 hook 方法

zinx/ziface/iserver.go

1
2
3
4
5
6
7
8
9
10
11
12
13
14
15
16
17
18
19
20
type IServer interface{
//启动服务器方法
Start()
//停止服务器方法
Stop()
//开启业务服务方法
Serve()
//路由功能:给当前服务注册一个路由业务方法,供客户端链接处理使用
AddRouter(msgId uint32, router IRouter)
//得到链接管理
GetConnMgr() IConnManager
//设置该Server的连接创建时Hook函数
SetOnConnStart(func (IConnection))
//设置该Server的连接断开时的Hook函数
SetOnConnStop(func (IConnection))
//调用连接OnConnStart Hook函数
CallOnConnStart(conn IConnection)
//调用连接OnConnStop Hook函数
CallOnConnStop(conn IConnection)
}

zinx/znet/server.go

1
2
3
4
5
6
7
8
9
10
11
12
13
14
15
16
17
18
19
20
21
22
//iServer 接口实现,定义一个Server服务类
type Server struct {
//服务器的名称
Name string
//tcp4 or other
IPVersion string
//服务绑定的IP地址
IP string
//服务绑定的端口
Port int
//当前Server的消息管理模块,用来绑定MsgId和对应的处理方法
msgHandler ziface.IMsgHandle
//当前Server的链接管理器
ConnMgr ziface.IConnManager
// =======================
//新增两个hook函数原型
//该Server的连接创建时Hook函数
OnConnStart func(conn ziface.IConnection)
//该Server的连接断开时的Hook函数
OnConnStop func(conn ziface.IConnection)
// =======================
}

实现添加 hook 函数的接口和调用 hook 函数的接口。

1
2
3
4
5
6
7
8
9
10
11
12
13
14
15
16
17
18
19
20
21
22
//设置该Server的连接创建时Hook函数
func (s *Server) SetOnConnStart(hookFunc func (ziface.IConnection)) {
s.OnConnStart = hookFunc
}
//设置该Server的连接断开时的Hook函数
func (s *Server) SetOnConnStop(hookFunc func (ziface.IConnection)) {
s.OnConnStop = hookFunc
}
//调用连接OnConnStart Hook函数
func (s *Server) CallOnConnStart(conn ziface.IConnection) {
if s.OnConnStart != nil {
fmt.Println("---> CallOnConnStart....")
s.OnConnStart(conn)
}
}
//调用连接OnConnStop Hook函数
func (s *Server) CallOnConnStop(conn ziface.IConnection) {
if s.OnConnStop != nil {
fmt.Println("---> CallOnConnStop....")
s.OnConnStop(conn)
}
}

那么接下来,需要选定两个 Hook 方法的调用位置。

一个是创建链接之后:

zinx/znet/connection.go

1
2
3
4
5
6
7
8
9
10
11
//启动连接,让当前连接开始工作
func (c *Connection) Start() {
//1 开启用户从客户端读取数据流程的Goroutine
go c.StartReader()
//2 开启用于写回客户端数据流程的Goroutine
go c.StartWriter()
//==================
//按照用户传递进来的创建连接时需要处理的业务,执行钩子方法
c.TcpServer.CallOnConnStart(c)
//==================
}

一个是停止链接之前:

zinx/znet/connection.go

1
2
3
4
5
6
7
8
9
10
11
12
13
14
15
16
17
18
19
20
21
22
//停止连接,结束当前连接状态M
func (c *Connection) Stop() {
fmt.Println("Conn Stop()...ConnID = ", c.ConnID)
//如果当前链接已经关闭
if c.isClosed == true {
return
}
c.isClosed = true
//==================
//如果用户注册了该链接的关闭回调业务,那么在此刻应该显示调用
c.TcpServer.CallOnConnStop(c)
//==================
// 关闭socket链接
c.Conn.Close()
//关闭Writer
c.ExitBuffChan <- true
//将链接从连接管理器中删除
c.TcpServer.GetConnMgr().Remove(c)
//关闭该链接全部管道
close(c.ExitBuffChan)
close(c.msgBuffChan)
}

好了,现在我们基本上已经将全部的连接管理的功能集成到 Zinx 中了,接下来就需要测试一下链接管理模块是否可以使用了。

测试

写一个服务端:

Server.go

1
2
3
4
5
6
7
8
9
10
11
12
13
14
15
16
17
18
19
20
21
22
23
24
25
26
27
28
29
30
31
32
33
34
35
36
37
38
39
40
41
42
43
44
45
46
47
48
49
50
51
52
53
54
55
56
57
package main
import (
"fmt"
"zinx/ziface"
"zinx/znet"
)
//ping test 自定义路由
type PingRouter struct {
znet.BaseRouter
}
//Ping Handle
func (this *PingRouter) Handle(request ziface.IRequest) {
fmt.Println("Call PingRouter Handle")
//先读取客户端的数据,再回写ping...ping...ping
fmt.Println("recv from client : msgId=", request.GetMsgID(), ", data=", string(request.GetData()))
err := request.GetConnection().SendBuffMsg(0, []byte("ping...ping...ping"))
if err != nil {
fmt.Println(err)
}
}
type HelloZinxRouter struct {
znet.BaseRouter
}
//HelloZinxRouter Handle
func (this *HelloZinxRouter) Handle(request ziface.IRequest) {
fmt.Println("Call HelloZinxRouter Handle")
//先读取客户端的数据,再回写ping...ping...ping
fmt.Println("recv from client : msgId=", request.GetMsgID(), ", data=", string(request.GetData()))
err := request.GetConnection().SendBuffMsg(1, []byte("Hello Zinx Router V0.8"))
if err != nil {
fmt.Println(err)
}
}
//创建连接的时候执行
func DoConnectionBegin(conn ziface.IConnection) {
fmt.Println("DoConnecionBegin is Called ... ")
err := conn.SendMsg(2, []byte("DoConnection BEGIN..."))
if err != nil {
fmt.Println(err)
}
}
//连接断开的时候执行
func DoConnectionLost(conn ziface.IConnection) {
fmt.Println("DoConneciotnLost is Called ... ")
}
func main() {
//创建一个server句柄
s := znet.NewServer()
//注册链接hook回调函数
s.SetOnConnStart(DoConnectionBegin)
s.SetOnConnStop(DoConnectionLost)
//配置路由
s.AddRouter(0, &PingRouter{})
s.AddRouter(1, &HelloZinxRouter{})
//开启服务
s.Serve()
}

我们这里注册了两个 Hook 函数一个是链接初始化之后DoConnectionBegin()和链接停止之前DoConnectionLost()。

DoConnectionBegin()会发给客户端一个消息 2 的文本,并且在服务端打印一个调试信息”DoConnecionBegin is Called…”

DoConnectionLost()在服务端打印一个调试信息”DoConneciotnLost is Called…”

客户端:

Client.go

1
2
3
4
5
6
7
8
9
10
11
12
13
14
15
16
17
18
19
20
21
22
23
24
25
26
27
28
29
30
31
32
33
34
35
36
37
38
39
40
41
42
43
44
45
46
47
48
49
50
51
52
53
54
55
56
57
package main
import (
"fmt"
"io"
"net"
"time"
"zinx/znet"
)
/*
模拟客户端
*/
func main() {
fmt.Println("Client Test ... start")
//3秒之后发起测试请求,给服务端开启服务的机会
time.Sleep(3 * time.Second)
conn,err := net.Dial("tcp", "127.0.0.1:7777")
if err != nil {
fmt.Println("client start err, exit!")
return
}
for {
//发封包message消息
dp := znet.NewDataPack()
msg, _ := dp.Pack(znet.NewMsgPackage(0,[]byte("Zinx V0.8 Client0 Test Message")))
_, err := conn.Write(msg)
if err !=nil {
fmt.Println("write error err ", err)
return
}
//先读出流中的head部分
headData := make([]byte, dp.GetHeadLen())
_, err = io.ReadFull(conn, headData) //ReadFull 会把msg填充满为止
if err != nil {
fmt.Println("read head error")
break
}
//将headData字节流 拆包到msg中
msgHead, err := dp.Unpack(headData)
if err != nil {
fmt.Println("server unpack err:", err)
return
}
if msgHead.GetDataLen() > 0 {
//msg 是有data数据的,需要再次读取data数据
msg := msgHead.(*znet.Message)
msg.Data = make([]byte, msg.GetDataLen())
//根据dataLen从io中读取字节流
_, err := io.ReadFull(conn, msg.Data)
if err != nil {
fmt.Println("server unpack data err:", err)
return
}
fmt.Println("==> Recv Msg: ID=", msg.Id, ", len=", msg.DataLen, ", data=", string(msg.Data))
}
time.Sleep(1*time.Second)
}
}

测试结果:

客户端创建成功,回调 Hook 已经执行,并且 Conn 被添加到 ConnManager 中, conn num = 1,当我们手动 CTRL+C 关闭客户端的时候, 服务器 ConnManager 已经成功将 Conn 摘掉,conn num = 0。

同时服务端也打印出 conn 停止之后的回调信息。
8899

实验总结

今天我们完成了 zinx 0.9 版本,完成了链接控制的功能,以及缓冲包的使用,大家在实验结束后请思考一下,使用缓冲和不使用缓冲的优缺点是什么。
说明

本文档按照实验楼–Go 并发服务器框架 Zinx 入门的文档同步学习记录(大部分内容相同)
https://www.lanqiao.cn/courses/1639
主要有以下原因:
1、模仿大神写教程的风格
2、验证每一个步骤,而不是简简单单的复制教程中的代码。简单重现

实验介绍

我们现在就需要给 Zinx 添加消息队列和多任务 Worker 机制了。
88

知识点

  • 消息队列
  • 工作池

准备工作

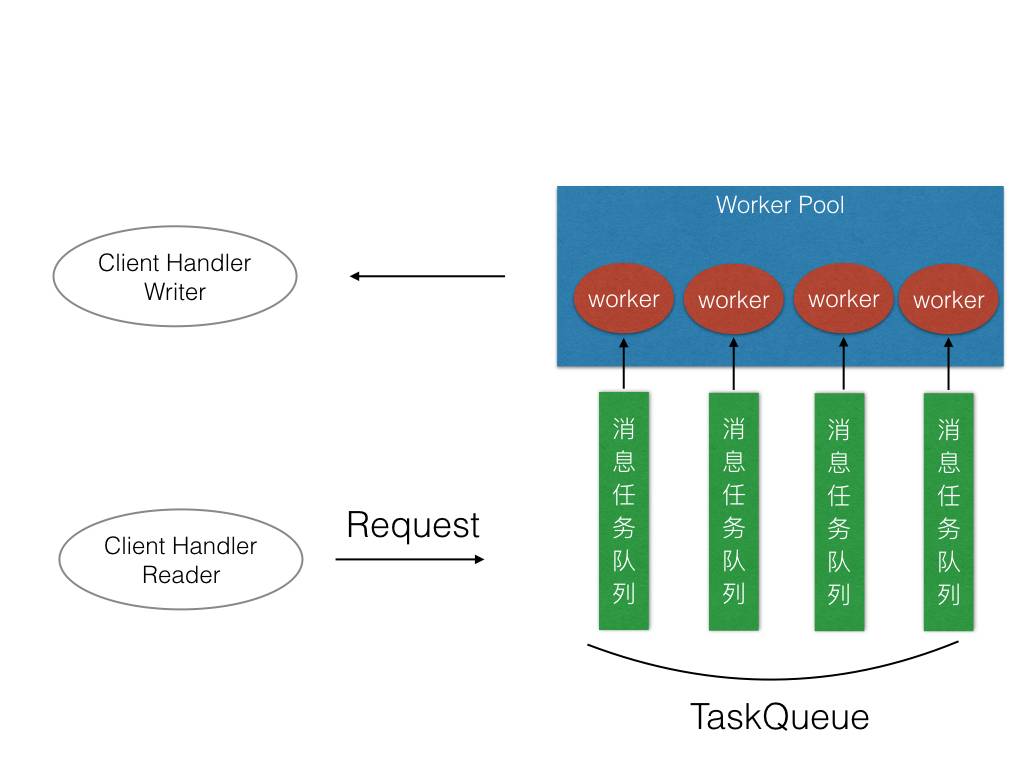
我们可以通过 worker 的数量来限定处理业务的固定 goroutine 数量,而不是无限制的开辟 Goroutine,虽然我们知道 go 的调度算法已经做的很极致了,但是大数量的 Goroutine 依然会带来一些不必要的环境切换成本,这些本应该是服务器应该节省掉的成本。我们可以用消息队列来缓冲 worker 工作的数据。

初步我们的设计结构如下图:

8801

创建消息队列

首先,处理消息队列的部分,我们应该集成到MsgHandler模块下,因为属于我们消息模块范畴内的。

zinx/znet/msghandler.go

1
2
3
4
5
6
7
8
9
10
11
12
13
type MsgHandle struct {
Apis map[uint32]ziface.IRouter //存放每个MsgId 所对应的处理方法的map属性
WorkerPoolSize uint32 //业务工作Worker池的数量
TaskQueue []chan ziface.IRequest //Worker负责取任务的消息队列
}
func NewMsgHandle() *MsgHandle {
return &MsgHandle{
Apis: make(map[uint32]ziface.IRouter),
WorkerPoolSize:utils.GlobalObject.WorkerPoolSize,
//一个worker对应一个queue
TaskQueue:make([]chan ziface.IRequest, utils.GlobalObject.WorkerPoolSize),
}
}

这里添加两个成员:

  • WokerPoolSize:作为工作池的数量,因为 TaskQueue 中的每个队列应该是和一个 Worker 对应的,所以我们在创建 TaskQueue 中队列数量要和 Worker 的数量一致。

  • TaskQueue真是一个 Request 请求信息的 channel 集合。用来缓冲提供 worker 调用的 Request 请求信息,worker 会从对应的队列中获取客户端的请求数据并且处理掉。

当然WorkerPoolSize最好也可以从GlobalObject获取,并且zinx.json配置文件可以手动配置。

zinx/utils/globalobj.go

1
2
3
4
5
6
7
8
9
10
11
12
13
14
15
16
17
18
19
20
21
22
23
24
25
26
27
28
29
30
31
32
33
34
35
36
37
38
39
40
41
42
43
44
45
46
/*
存储一切有关Zinx框架的全局参数,供其他模块使用
一些参数也可以通过 用户根据 zinx.json来配置
*/
type GlobalObj struct {
/*
Server
*/
TcpServer ziface.IServer //当前Zinx的全局Server对象
Host string //当前服务器主机IP
TcpPort int //当前服务器主机监听端口号
Name string //当前服务器名称
/*
Zinx
*/
Version string //当前Zinx版本号
MaxPacketSize uint32 //都需数据包的最大值
MaxConn int //当前服务器主机允许的最大链接个数
WorkerPoolSize uint32 //业务工作Worker池的数量
MaxWorkerTaskLen uint32 //业务工作Worker对应负责的任务队列最大任务存储数量
/*
config file path
*/
ConfFilePath string
}
//...
//...
/*
提供init方法,默认加载
*/
func init() {
//初始化GlobalObject变量,设置一些默认值
GlobalObject = &GlobalObj{
Name: "ZinxServerApp",
Version: "V0.4",
TcpPort: 7777,
Host: "0.0.0.0",
MaxConn: 12000,
MaxPacketSize: 4096,
ConfFilePath: "conf/zinx.json",
WorkerPoolSize: 10,
MaxWorkerTaskLen: 1024,
}
//从配置文件中加载一些用户配置的参数
GlobalObject.Reload()
}

创建及启动 Worker 工作池

现在添加 Worker 工作池,先定义一些启动工作池的接口。

zinx/ziface/imsghandler.go

1
2
3
4
5
6
7
8
9
/*
消息管理抽象层
*/
type IMsgHandle interface{
DoMsgHandler(request IRequest) //马上以非阻塞方式处理消息
AddRouter(msgId uint32, router IRouter) //为消息添加具体的处理逻辑
StartWorkerPool() //启动worker工作池
SendMsgToTaskQueue(request IRequest) //将消息交给TaskQueue,由worker进行处理
}

zinx/znet/msghandler.go

1
2
3
4
5
6
7
8
9
10
11
12
13
14
15
16
17
18
19
20
21
22
23
24
// 注意,头文件中要引入 zinx/utils
//启动一个Worker工作流程
func (mh *MsgHandle) StartOneWorker(workerID int, taskQueue chan ziface.IRequest) {
fmt.Println("Worker ID = ", workerID, " is started.")
//不断的等待队列中的消息
for {
select {
//有消息则取出队列的Request,并执行绑定的业务方法
case request := <-taskQueue:
mh.DoMsgHandler(request)
}
}
}
//启动worker工作池
func (mh *MsgHandle) StartWorkerPool() {
//遍历需要启动worker的数量,依此启动
for i:= 0; i < int(mh.WorkerPoolSize); i++ {
//一个worker被启动
//给当前worker对应的任务队列开辟空间
mh.TaskQueue[i] = make(chan ziface.IRequest, utils.GlobalObject.MaxWorkerTaskLen)
//启动当前Worker,阻塞的等待对应的任务队列是否有消息传递进来
go mh.StartOneWorker(i, mh.TaskQueue[i])
}
}

StartWorkerPool()方法是启动 Worker 工作池,这里根据用户配置好的WorkerPoolSize的数量来启动,然后分别给每个 Worker 分配一个TaskQueue,然后用一个 goroutine 来承载一个 Worker 的工作业务。

StartOneWorker()方法就是一个 Worker 的工作业务,每个 worker 是不会退出的(目前没有设定 worker 的停止工作机制),会永久的从对应的 TaskQueue 中等待消息,并处理。

发送消息给消息队列
现在,worker 工作池已经准备就绪了,那么就需要有一个给到 worker 工作池消息的入口,我们再定义一个方法

zinx/znet/msghandler.go

1
2
3
4
5
6
7
8
9
10
//将消息交给TaskQueue,由worker进行处理
func (mh *MsgHandle)SendMsgToTaskQueue(request ziface.IRequest) {
//根据ConnID来分配当前的连接应该由哪个worker负责处理
//轮询的平均分配法则
//得到需要处理此条连接的workerID
workerID := request.GetConnection().GetConnID() % mh.WorkerPoolSize
fmt.Println("Add ConnID=", request.GetConnection().GetConnID()," request msgID=", request.GetMsgID(), "to workerID=", workerID)
//将请求消息发送给任务队列
mh.TaskQueue[workerID] <- request
}

SendMsgToTaskQueue()作为工作池的数据入口,这里面采用的是轮询的分配机制,因为不同链接信息都会调用这个入口,那么到底应该由哪个 worker 处理该链接的请求处理,整理用的是一个简单的求模运算。用余数和 workerID 的匹配来进行分配。

最终将 request 请求数据发送给对应 worker 的 TaskQueue,那么对应的 worker 的 Goroutine 就会处理该链接请求了。

Zinx-V0.8 代码实现

好了,现在需要将消息队列和多任务 worker 机制集成到我们 Zinx 的中了。我们在 Server 的Start()方法中,在服务端 Accept 之前,启动 Worker 工作池。

zinx/znet/server.go

1
2
3
4
5
6
7
8
9
10
11
12
13
14
15
16
17
18
//开启网络服务,只需要修改这里所提到的部分,对于打了 //... 的部分的意思是原来的代码不需要做修改
func (s *Server) Start() {
//...
//开启一个go去做服务端Linster业务
go func() {
//0 启动worker工作池机制
s.msgHandler.StartWorkerPool()
//1 获取一个TCP的Addr
addr, err := net.ResolveTCPAddr(s.IPVersion, fmt.Sprintf("%s:%d", s.IP, s.Port))
if err != nil {
fmt.Println("resolve tcp addr err: ", err)
return
}
//...
//...
}
}()
}

其次,当我们已经得到客户端的连接请求过来数据的时候,我们应该将数据发送给 Worker 工作池进行处理。

所以应该在 Connection 的StartReader()方法中修改:

zinx/znet/connection.go

1
2
3
4
5
6
7
8
9
10
11
12
13
14
15
16
17
18
19
20
21
22
23
// 注意,头文件中要引入 zinx/utils
/*
读消息Goroutine,用于从客户端中读取数据
*/
func (c *Connection) StartReader() {
fmt.Println("Reader Goroutine is running")
defer fmt.Println(c.RemoteAddr().String(), " conn reader exit!")
defer c.Stop()
for {
//...
req := Request{
conn:c,
msg:msg,
}
if utils.GlobalObject.WorkerPoolSize > 0 {
//已经启动工作池机制,将消息交给Worker处理
c.MsgHandler.SendMsgToTaskQueue(&req)
} else {
//从绑定好的消息和对应的处理方法中执行对应的Handle方法
go c.MsgHandler.DoMsgHandler(&req)
}
}
}

这里并没有强制使用多任务 Worker 机制,而是判断用户配置WorkerPoolSize的个数,如果大于 0,那么我就启动多任务机制处理链接请求消息,如果=0 或者<0 那么,我们依然只是之前的开启一个临时的 Goroutine 处理客户端请求消息。

测试

测试代码和 V0.6、V0.7 的代码一样。因为 Zinx 框架对外接口没有发生改变。

实验总结

我们今天实现了 Zinx 框架的工作池,同时解答了上一节中为什么我们的测试代码无需修改。我们的 Zinx 对外提供服务的接口没有改变,所以测试文件不需要修改。