说明 本文档按照实验楼–Go 并发服务器框架 Zinx 入门的文档同步学习记录(大部分内容相同)https://www.lanqiao.cn/courses/1639
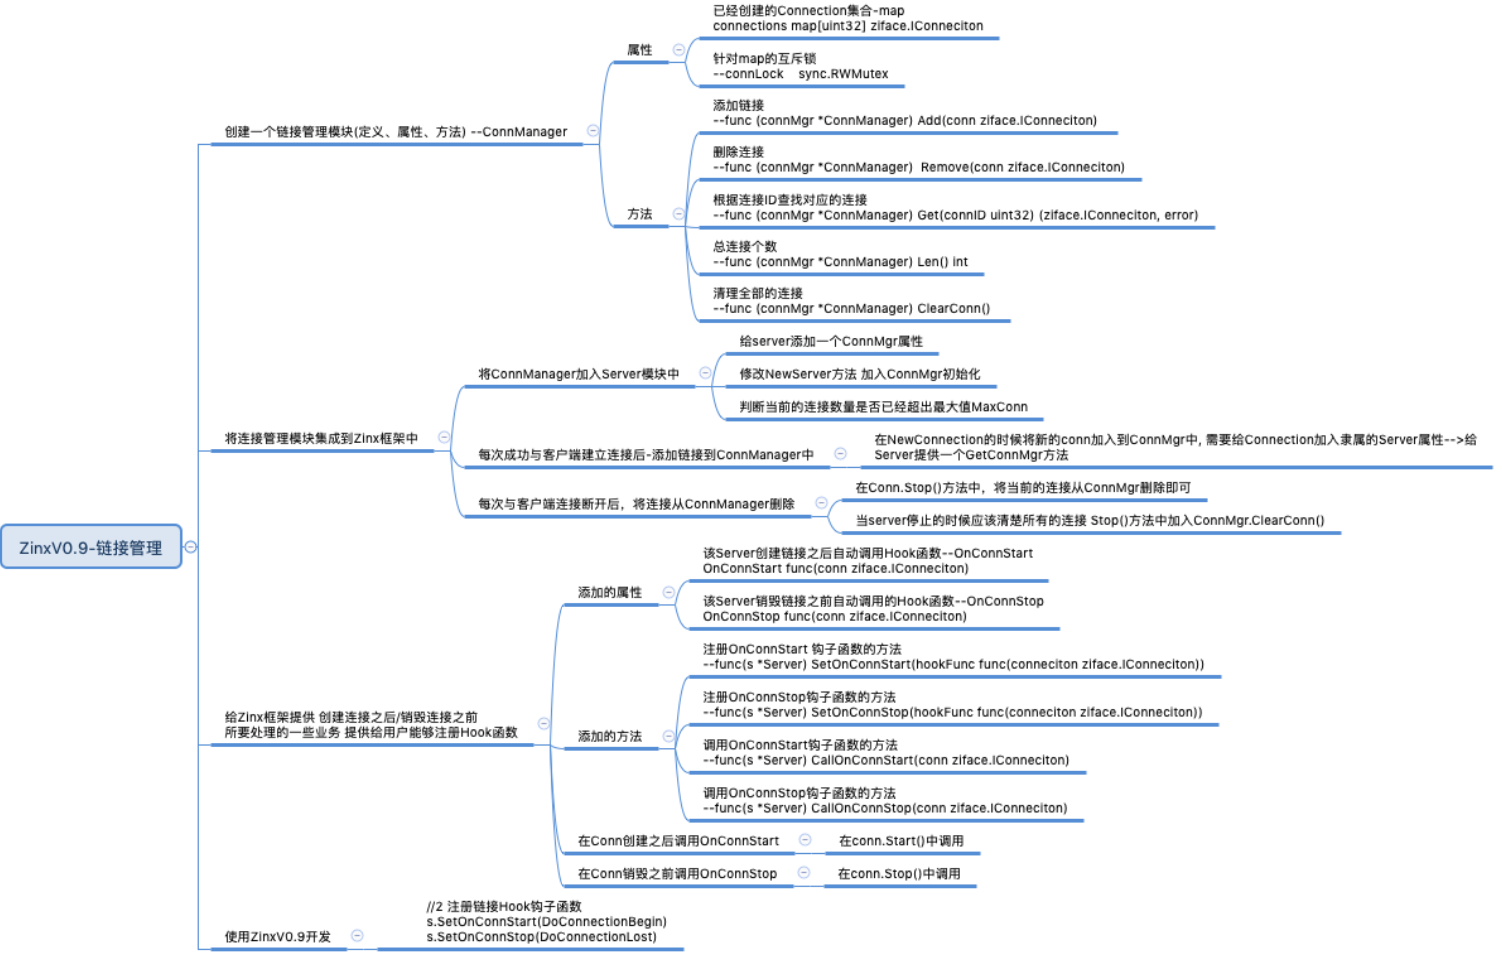
实验介绍 我们现在就需要给 Zinx 添加链接管理机制了。
知识点
创建链接管理模块 这里面我们就需要对链接有一个管理的模块。
我们在 ziface 和 znet 分别建立 iconnmanager.go 和 connmanager.go 文件。
zinx/ziface/iconmanager.go
1
2
3
4
5
6
7
8
9
10
11
package zifacetype IConnManager interface { Add(conn IConnection) Remove(conn IConnection) Get(connID uint32 ) (IConnection, error) Len() int ClearConn() }
这里定义了一些接口方法,添加链接、删除链接、根据 ID 获取链接、链接数量、和清除链接等。下面我们对这个接口进行实现。
这里面 ConnManager 中,其中用一个 map 来承载全部的连接信息,key 是连接 ID,value 则是连接本身。其中有一个读写锁 connLock 主要是针对 map 做多任务修改时的保护作用。
Remove() 方法只是单纯的将 conn 从 map 中摘掉,而 ClearConn() 方法则会先停止链接业务,c.Stop(),然后再从 map 中摘除。
zinx/znet/connmanager.go
1
2
3
4
5
6
7
8
9
10
11
12
13
14
15
16
17
18
19
20
21
22
23
24
25
26
27
28
29
30
31
32
33
34
35
36
37
38
39
40
41
42
43
44
45
46
47
48
49
50
51
52
53
54
55
56
57
58
59
60
61
62
63
64
65
66
67
68
69
package znetimport ( "errors" "fmt" "sync" "zinx/ziface" ) type ConnManager struct { connections map [uint32 ]ziface.IConnection connLock sync.RWMutex } func NewConnManager () *ConnManager return &ConnManager{ connections:make (map [uint32 ] ziface.IConnection), } } func (connMgr *ConnManager) Add (conn ziface.IConnection) connMgr.connLock.Lock() defer connMgr.connLock.Unlock() connMgr.connections[conn.GetConnID()] = conn fmt.Println("connection add to ConnManager successfully: conn num = " , connMgr.Len()) } func (connMgr *ConnManager) Remove (conn ziface.IConnection) connMgr.connLock.Lock() defer connMgr.connLock.Unlock() delete (connMgr.connections, conn.GetConnID()) fmt.Println("connection Remove ConnID=" ,conn.GetConnID(), " successfully: conn num = " , connMgr.Len()) } func (connMgr *ConnManager) Get (connID uint32 ) (ziface.IConnection, error) connMgr.connLock.RLock() defer connMgr.connLock.RUnlock() if conn, ok := connMgr.connections[connID]; ok { return conn, nil } else { return nil , errors.New("connection not found" ) } } func (connMgr *ConnManager) Len () int return len (connMgr.connections) } func (connMgr *ConnManager) ClearConn () connMgr.connLock.Lock() defer connMgr.connLock.Unlock() for connID, conn := range connMgr.connections { conn.Stop() delete (connMgr.connections,connID) } fmt.Println("Clear All Connections successfully: conn num = " , connMgr.Len()) }
链接管理模块集成到 Zinx 中 现在需要将ConnManager添加到Server中。
zinx/znet/server.go
1 2 3 4 5 6 7 8 9 10 11 12 13 14 15 16 17 18 19 20 21 22 23 24 25 26 27 28 29 30 type Server struct { Name string IPVersion string IP string Port int msgHandler ziface.IMsgHandle ConnMgr ziface.IConnManager } func NewServer () ziface .IServer utils.GlobalObject.Reload() s:= &Server { Name :utils.GlobalObject.Name, IPVersion:"tcp4" , IP:utils.GlobalObject.Host, Port:utils.GlobalObject.TcpPort, msgHandler: NewMsgHandle(), ConnMgr:NewConnManager(), } return s }
现在,既然 server 具备了 ConnManager 成员,在获取的时候需要给抽象层提供一个获取 ConnManager 方法 。
zinx/ziface/iserver.go
1
2
3
4
5
6
7
8
9
10
11
12
type IServer interface { Start() Stop() Serve() AddRouter(msgId uint32 , router IRouter) GetConnMgr() IConnManager }
zinx/znet/server.go
1 2 3 4 func (s *Server) GetConnMgr () ziface .IConnManager return s.ConnMgr }
因为我们现在在 server 中有链接的管理,有的时候 conn 也需要得到这个 ConnMgr 的使用权,那么我们需要将Server和Connection建立能够互相索引的关系,我们在Connection中,添加 Server 当前 conn 隶属的 server 句柄。
zinx/znet/connection.go
1
2
3
4
5
6
7
8
9
10
11
12
13
14
15
16
17
18
type Connection struct { TcpServer ziface.IServer Conn *net.TCPConn ConnID uint32 isClosed bool MsgHandler ziface.IMsgHandle ExitBuffChan chan bool msgChan chan []byte msgBuffChan chan []byte }
链接的添加 现在我们怎么样选择将创建好的连接添加到ConnManager中呢,这里我们选择在初始化一个新链接的时候,加进来就好了。
zinx/znet/connection.go
1 2 3 4 5 6 7 8 9 10 11 12 13 14 15 16 17 func NewConntion (server ziface.IServer, conn *net.TCPConn, connID uint32 , msgHandler ziface.IMsgHandle) *Connection c := &Connection{ TcpServer:server, Conn: conn, ConnID: connID, isClosed: false , MsgHandler: msgHandler, ExitBuffChan: make (chan bool , 1 ), msgChan:make (chan []byte ), msgBuffChan:make (chan []byte , utils.GlobalObject.MaxMsgChanLen), } c.TcpServer.GetConnMgr().Add(c) return c }
Server 中添加链接数量的判断 在 server 的Start()方法中,在 Accept 与客户端链接建立成功后,可以直接对链接的个数做一个判断。
zinx/znet/server.go
1 2 3 4 5 6 7 8 9 10 11 12 13 14 15 16 17 18 19 20 21 22 23 24 25 26 27 28 29 30 31 32 33 34 func (s *Server) Start () fmt.Printf("[START] Server name: %s,listenner at IP: %s, Port %d is starting\n" , s.Name, s.IP, s.Port) fmt.Printf("[Zinx] Version: %s, MaxConn: %d, MaxPacketSize: %d\n" , utils.GlobalObject.Version, utils.GlobalObject.MaxConn, utils.GlobalObject.MaxPacketSize) go func () for { conn, err := listenner.AcceptTCP() if err != nil { fmt.Println("Accept err " , err) continue } if s.ConnMgr.Len() >= utils.GlobalObject.MaxConn { conn.Close() continue } dealConn := NewConntion(s, conn, cid, s.msgHandler) cid ++ go dealConn.Start() } }() }
当然,我们应该在配置文件zinx.json或者在GlobalObject全局配置中,定义好我们期望的连接的最大数目限制MaxConn。 同时,因为这里添加了一个新的属性,所以全局配置也需要做出修改:
zinx/utils/globalobj.go
1
2
3
4
5
6
7
8
9
10
11
12
13
14
15
16
17
18
19
20
21
22
23
24
25
26
27
28
29
30
31
32
33
34
35
36
37
38
39
40
41
42
43
type GlobalObj struct { TcpServer ziface.IServer Host string TcpPort int Name string Version string MaxPacketSize uint32 MaxConn int WorkerPoolSize uint32 MaxWorkerTaskLen uint32 MaxMsgChanLen int ConfFilePath string } func init () GlobalObject = &GlobalObj{ Name: "ZinxServerApp" , Version: "V0.4" , TcpPort: 7777 , Host: "0.0.0.0" , MaxConn: 12000 , MaxPacketSize: 4096 , ConfFilePath: "conf/zinx.json" , WorkerPoolSize: 10 , MaxWorkerTaskLen: 1024 , MaxMsgChanLen: 16 , } GlobalObject.Reload() }
连接的删除 我们应该在连接停止的时候,将该连接从 ConnManager 中删除,所以在connection的Stop()方法中添加。
zinx/znet/connecion.go
1
2
3
4
5
6
7
8
9
10
11
12
13
14
15
16
17
func (c *Connection) Stop () fmt.Println("Conn Stop()...ConnID = " , c.ConnID) if c.isClosed == true { return } c.isClosed = true c.Conn.Close() c.ExitBuffChan <- true c.TcpServer.GetConnMgr().Remove(c) close (c.ExitBuffChan) close (c.msgBuffChan) }
当然,我们也应该在server停止的时候,将全部的连接清空。
zinx/znet/server.go
1
2
3
4
5
func (s *Server) Stop () fmt.Println("[STOP] Zinx server , name " , s.Name) s.ConnMgr.ClearConn() }
现在我们已经将连接管理成功的集成到了 Zinx 之中了。 下面我们接着实现带缓冲的发包方法。
链接的带缓冲的发包方法 我们之前给Connection提供了一个发消息的方法SendMsg(),这个是将数据发送到一个无缓冲的 channel 中msgChan。但是如果客户端链接比较多的话,如果对方处理不及时,可能会出现短暂的阻塞现象,我们可以做一个提供一定缓冲的发消息方法,做一些非阻塞的发送体验。
zinx/ziface/iconnection.go
1 2 3 4 5 6 7 8 9 10 11 12 13 14 15 16 17 type IConnection interface { Start() Stop() GetTCPConnection() *net.TCPConn GetConnID() uint32 RemoteAddr() net.Addr SendMsg(msgId uint32 , data []byte ) error SendBuffMsg(msgId uint32 , data []byte ) error }
zinx/znet/connection.go
1
2
3
4
5
6
7
8
9
10
11
12
13
14
15
16
17
18
19
20
21
22
23
24
25
26
27
28
29
30
31
32
33
34
35
type Connection struct { TcpServer ziface.IServer Conn *net.TCPConn ConnID uint32 isClosed bool MsgHandler ziface.IMsgHandle ExitBuffChan chan bool msgChan chan []byte msgBuffChan chan []byte } func NewConntion (server ziface.IServer, conn *net.TCPConn, connID uint32 , msgHandler ziface.IMsgHandle) *Connection c := &Connection{ TcpServer:server, Conn: conn, ConnID: connID, isClosed: false , MsgHandler: msgHandler, ExitBuffChan: make (chan bool , 1 ), msgChan:make (chan []byte ), msgBuffChan:make (chan []byte , utils.GlobalObject.MaxMsgChanLen), } c.TcpServer.GetConnMgr().Add(c) return c }
然后将SendBuffMsg()方法实现一下:
1
2
3
4
5
6
7
8
9
10
11
12
13
14
15
func (c *Connection) SendBuffMsg (msgId uint32 , data []byte ) error if c.isClosed == true { return errors.New("Connection closed when send buff msg" ) } dp := NewDataPack() msg, err := dp.Pack(NewMsgPackage(msgId, data)) if err != nil { fmt.Println("Pack error msg id = " , msgId) return errors.New("Pack error msg " ) } c.msgBuffChan <- msg return nil }
我们在 Writer 中也要有对msgBuffChan的数据监控:
1 2 3 4 5 6 7 8 9 10 11 12 13 14 15 16 17 18 19 20 21 22 23 24 25 26 27 28 29 30 31 func (c *Connection) StartWriter () fmt.Println("[Writer Goroutine is running]" ) defer fmt.Println(c.RemoteAddr().String(), "[conn Writer exit!]" ) for { select { case data := <-c.msgChan: if _, err := c.Conn.Write(data); err != nil { fmt.Println("Send Data error:, " , err, " Conn Writer exit" ) return } case data, ok:= <-c.msgBuffChan: if ok { if _, err := c.Conn.Write(data); err != nil { fmt.Println("Send Buff Data error:, " , err, " Conn Writer exit" ) return } } else { break fmt.Println("msgBuffChan is Closed" ) } case <-c.ExitBuffChan: return } } }
现在,我们实现了带缓冲的发包方法。接下来,我们去实现注册链接启动/停止自定义 Hook 方法功能。
注册链接启动/停止自定义 Hook 方法功能 有的时候,在创建链接的时候,希望在创建链接之后、和断开链接之前,执行一些用户自定义的业务。那么我们就需要给 Zinx 增添两个链接创建后和断开前时机的回调函数,一般也称作 Hook(钩子)函数。
我们可以通过 Server 来注册 conn 的 hook 方法
zinx/ziface/iserver.go
1
2
3
4
5
6
7
8
9
10
11
12
13
14
15
16
17
18
19
20
type IServer interface { Start() Stop() Serve() AddRouter(msgId uint32 , router IRouter) GetConnMgr() IConnManager SetOnConnStart(func (IConnection) ) SetOnConnStop(func (IConnection) ) CallOnConnStart(conn IConnection) CallOnConnStop(conn IConnection) }
zinx/znet/server.go
1 2 3 4 5 6 7 8 9 10 11 12 13 14 15 16 17 18 19 20 21 22 type Server struct { Name string IPVersion string IP string Port int msgHandler ziface.IMsgHandle ConnMgr ziface.IConnManager OnConnStart func (conn ziface.IConnection) OnConnStop func (conn ziface.IConnection) }
实现添加 hook 函数的接口和调用 hook 函数的接口。
1 2 3 4 5 6 7 8 9 10 11 12 13 14 15 16 17 18 19 20 21 22 func (s *Server) SetOnConnStart (hookFunc func (ziface.IConnection) ) s.OnConnStart = hookFunc } func (s *Server) SetOnConnStop (hookFunc func (ziface.IConnection) ) s.OnConnStop = hookFunc } func (s *Server) CallOnConnStart (conn ziface.IConnection) if s.OnConnStart != nil { fmt.Println("---> CallOnConnStart...." ) s.OnConnStart(conn) } } func (s *Server) CallOnConnStop (conn ziface.IConnection) if s.OnConnStop != nil { fmt.Println("---> CallOnConnStop...." ) s.OnConnStop(conn) } }
那么接下来,需要选定两个 Hook 方法的调用位置。
一个是创建链接之后:
zinx/znet/connection.go
1 2 3 4 5 6 7 8 9 10 11 func (c *Connection) Start () go c.StartReader() go c.StartWriter() c.TcpServer.CallOnConnStart(c) }
一个是停止链接之前:
zinx/znet/connection.go
1 2 3 4 5 6 7 8 9 10 11 12 13 14 15 16 17 18 19 20 21 22 func (c *Connection) Stop () fmt.Println("Conn Stop()...ConnID = " , c.ConnID) if c.isClosed == true { return } c.isClosed = true c.TcpServer.CallOnConnStop(c) c.Conn.Close() c.ExitBuffChan <- true c.TcpServer.GetConnMgr().Remove(c) close (c.ExitBuffChan) close (c.msgBuffChan) }
好了,现在我们基本上已经将全部的连接管理的功能集成到 Zinx 中了,接下来就需要测试一下链接管理模块是否可以使用了。
测试 写一个服务端:
Server.go
1
2
3
4
5
6
7
8
9
10
11
12
13
14
15
16
17
18
19
20
21
22
23
24
25
26
27
28
29
30
31
32
33
34
35
36
37
38
39
40
41
42
43
44
45
46
47
48
49
50
51
52
53
54
55
56
57
package mainimport ( "fmt" "zinx/ziface" "zinx/znet" ) type PingRouter struct { znet.BaseRouter } func (this *PingRouter) Handle (request ziface.IRequest) fmt.Println("Call PingRouter Handle" ) fmt.Println("recv from client : msgId=" , request.GetMsgID(), ", data=" , string (request.GetData())) err := request.GetConnection().SendBuffMsg(0 , []byte ("ping...ping...ping" )) if err != nil { fmt.Println(err) } } type HelloZinxRouter struct { znet.BaseRouter } func (this *HelloZinxRouter) Handle (request ziface.IRequest) fmt.Println("Call HelloZinxRouter Handle" ) fmt.Println("recv from client : msgId=" , request.GetMsgID(), ", data=" , string (request.GetData())) err := request.GetConnection().SendBuffMsg(1 , []byte ("Hello Zinx Router V0.8" )) if err != nil { fmt.Println(err) } } func DoConnectionBegin (conn ziface.IConnection) fmt.Println("DoConnecionBegin is Called ... " ) err := conn.SendMsg(2 , []byte ("DoConnection BEGIN..." )) if err != nil { fmt.Println(err) } } func DoConnectionLost (conn ziface.IConnection) fmt.Println("DoConneciotnLost is Called ... " ) } func main () s := znet.NewServer() s.SetOnConnStart(DoConnectionBegin) s.SetOnConnStop(DoConnectionLost) s.AddRouter(0 , &PingRouter{}) s.AddRouter(1 , &HelloZinxRouter{}) s.Serve() }
我们这里注册了两个 Hook 函数一个是链接初始化之后DoConnectionBegin()和链接停止之前DoConnectionLost()。
DoConnectionBegin()会发给客户端一个消息 2 的文本,并且在服务端打印一个调试信息”DoConnecionBegin is Called…”
DoConnectionLost()在服务端打印一个调试信息”DoConneciotnLost is Called…”
客户端:
Client.go
1
2
3
4
5
6
7
8
9
10
11
12
13
14
15
16
17
18
19
20
21
22
23
24
25
26
27
28
29
30
31
32
33
34
35
36
37
38
39
40
41
42
43
44
45
46
47
48
49
50
51
52
53
54
55
56
57
package mainimport ( "fmt" "io" "net" "time" "zinx/znet" ) func main () fmt.Println("Client Test ... start" ) time.Sleep(3 * time.Second) conn,err := net.Dial("tcp" , "127.0.0.1:7777" ) if err != nil { fmt.Println("client start err, exit!" ) return } for { dp := znet.NewDataPack() msg, _ := dp.Pack(znet.NewMsgPackage(0 ,[]byte ("Zinx V0.8 Client0 Test Message" ))) _, err := conn.Write(msg) if err !=nil { fmt.Println("write error err " , err) return } headData := make ([]byte , dp.GetHeadLen()) _, err = io.ReadFull(conn, headData) if err != nil { fmt.Println("read head error" ) break } msgHead, err := dp.Unpack(headData) if err != nil { fmt.Println("server unpack err:" , err) return } if msgHead.GetDataLen() > 0 { msg := msgHead.(*znet.Message) msg.Data = make ([]byte , msg.GetDataLen()) _, err := io.ReadFull(conn, msg.Data) if err != nil { fmt.Println("server unpack data err:" , err) return } fmt.Println("==> Recv Msg: ID=" , msg.Id, ", len=" , msg.DataLen, ", data=" , string (msg.Data)) } time.Sleep(1 *time.Second) } }
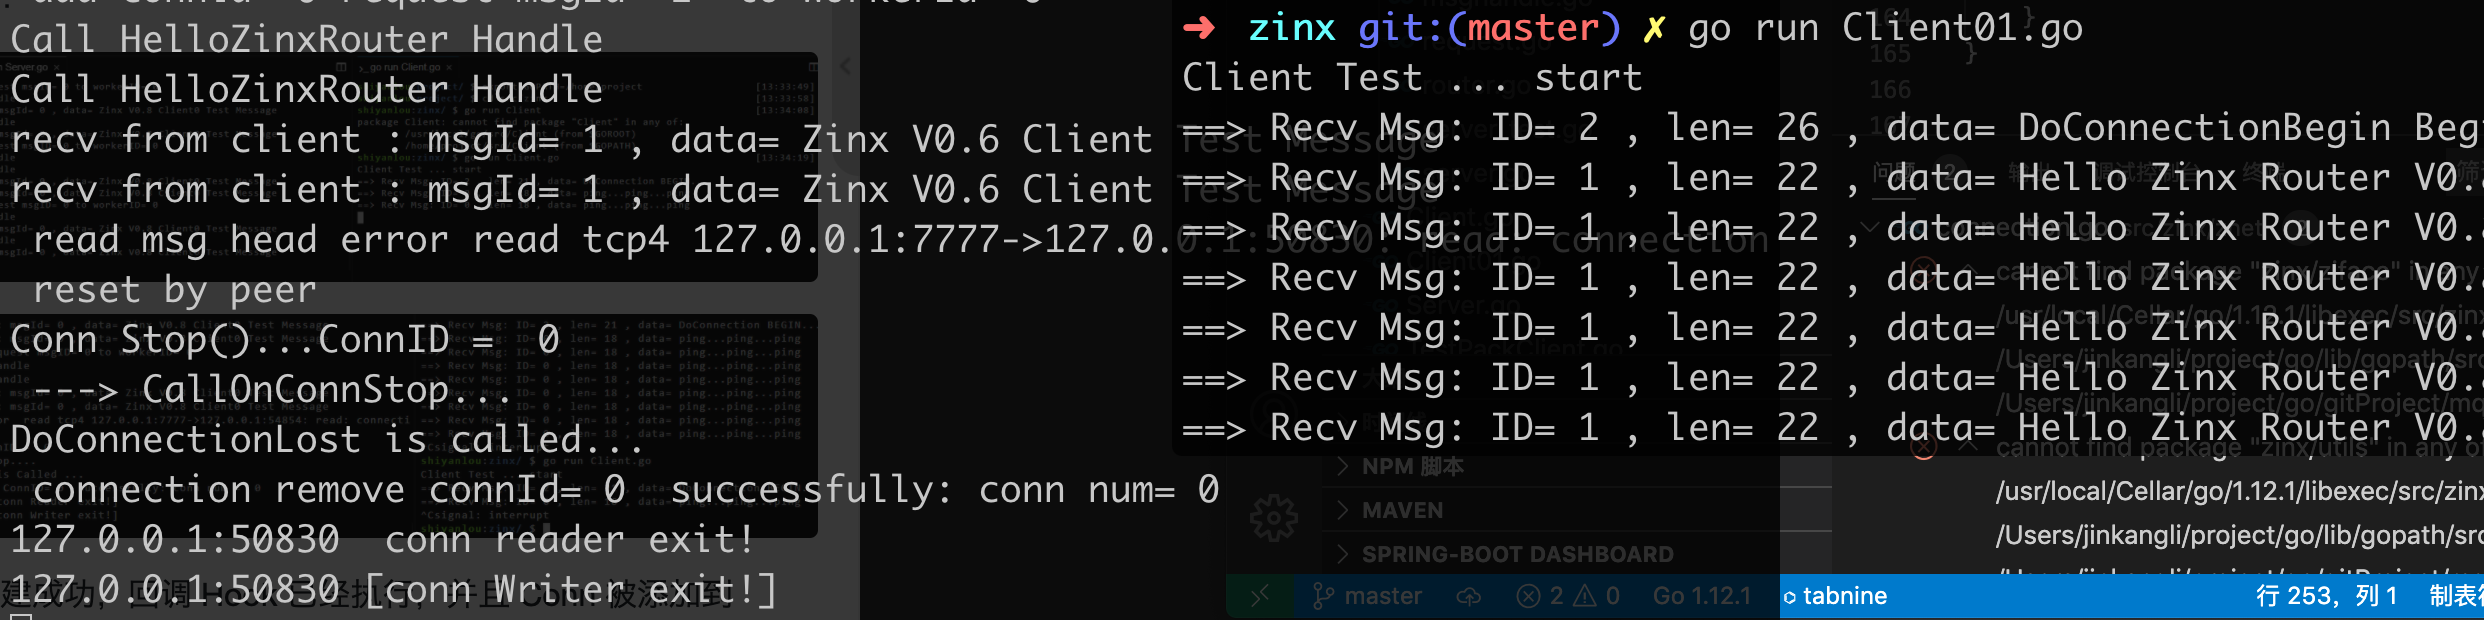
测试结果: 客户端创建成功,回调 Hook 已经执行,并且 Conn 被添加到 ConnManager 中, conn num = 1,当我们手动 CTRL+C 关闭客户端的时候, 服务器 ConnManager 已经成功将 Conn 摘掉,conn num = 0。
同时服务端也打印出 conn 停止之后的回调信息。
实验总结 今天我们完成了 zinx 0.9 版本,完成了链接控制的功能,以及缓冲包的使用,大家在实验结束后请思考一下,使用缓冲和不使用缓冲的优缺点是什么。