说明 本文档按照实验楼–Go 并发服务器框架 Zinx 入门的文档同步学习记录(大部分内容相同)https://www.lanqiao.cn/courses/1639
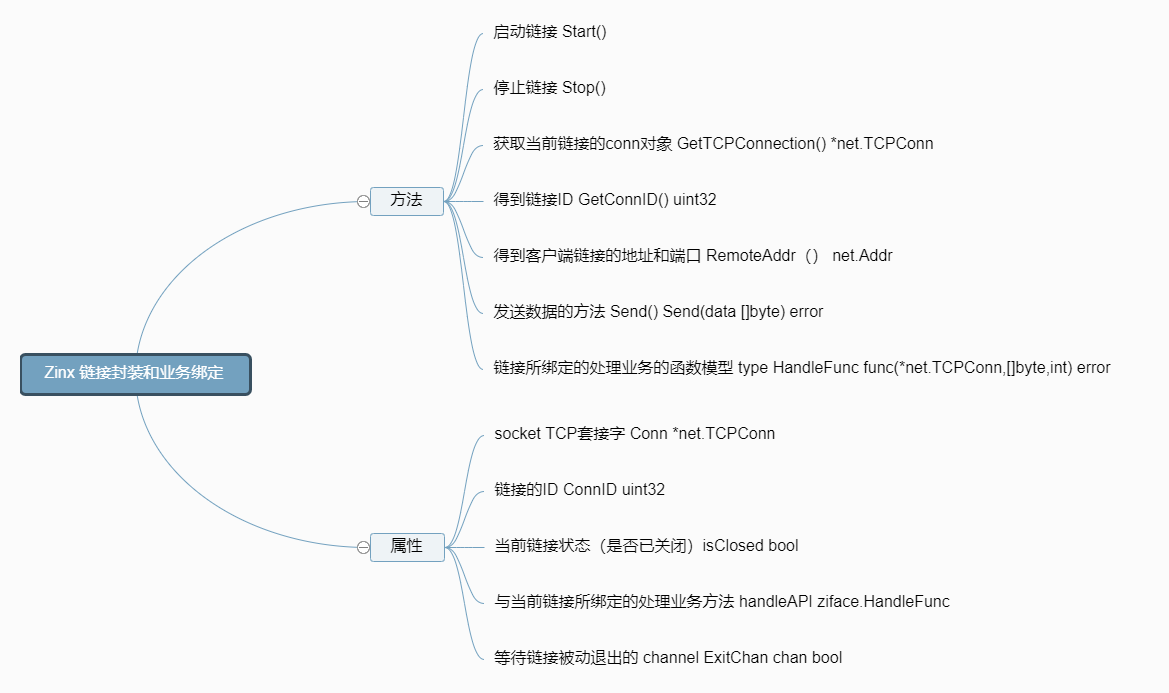
本节实验中,我们将完成 Zinx 框架的链接封装与业务绑定的模块。如下面的思维导图中所表示的这些功能。
知识点
ziface创建iconnection.go zinx/ziface/iconnection.go
因为接口中只定义方法,我们在实验介绍中的接口方法中,已经声明了这些方法。所以我们来直接看一下它的实现
1
2
3
4
5
6
7
8
9
10
11
12
13
14
15
16
17
package zifaceimport "net" type IConnection interface { Start() Stop() GetTCPConnection() *net.TCPConn GetConnID() uint32 RemoteAddr() net.Addr } type HandFunc func (*net.TCPConn, []byte , int ) error
znet创建connection.go zinx/znet/connection.go
我们这里再 Connection 中去实现接口中的方法。
1
2
3
4
5
6
7
8
9
10
11
12
13
14
15
16
17
18
19
20
21
22
23
24
25
26
27
28
29
30
31
32
33
34
35
36
37
38
39
40
41
42
43
44
45
46
47
48
49
50
51
52
53
54
55
56
57
58
59
60
61
62
63
64
65
66
67
68
69
70
71
72
73
74
75
76
77
78
79
80
81
82
83
84
85
86
87
88
89
90
package znetimport ( "fmt" "net" "zinx/ziface" ) type Connection struct { Conn *net.TCPConn ConnID uint32 isClosed bool handleAPI ziface.HandFunc ExitBuffChan chan bool } func NewConntion (conn *net.TCPConn, connID uint32 , callback_api ziface.HandFunc) *Connection c := &Connection{ Conn: conn, ConnID: connID, isClosed: false , handleAPI: callback_api, ExitBuffChan: make (chan bool , 1 ), } return c } func (c *Connection) StartReader () fmt.Println("Reader Goroutine is running" ) defer fmt.Println(c.RemoteAddr().String(), " conn reader exit!" ) defer c.Stop() for { buf := make ([]byte , 512 ) cnt, err := c.Conn.Read(buf) if err != nil { fmt.Println("recv buf err " , err) c.ExitBuffChan <- true continue } if err := c.handleAPI(c.Conn, buf, cnt); err !=nil { fmt.Println("connID " , c.ConnID, " handle is error" ) c.ExitBuffChan <- true return } } } func (c *Connection) Start () go c.StartReader() for { select { case <- c.ExitBuffChan: return } } } func (c *Connection) Stop () if c.isClosed == true { return } c.isClosed = true c.Conn.Close() c.ExitBuffChan <- true close (c.ExitBuffChan) } func (c *Connection) GetTCPConnection () *net .TCPConn return c.Conn } func (c *Connection) GetConnID () uint32 return c.ConnID } func (c *Connection) RemoteAddr () net .Addr return c.Conn.RemoteAddr() }
重新更正一下Server.go中处理conn的连接业务 我们的修改在 3.3 和 3.4 处。
1 2 3 4 5 dealConn := NewConntion(conn, cid, CallBackToClient) cid ++ go dealConn.Start()
CallBackToClient 是我们给当前客户端 conn 对象绑定的 handle 方法,当然目前是 server 端强制绑定的回显业务,我们之后会丰富框架,让这个用户可以让用户自定义指定 handle。
测试 进行测试之前,我们这一次选择不使用 go test 的方式进行,这里我们使用两个 go 文件,一个叫做 Server.go 一个叫做 Client.go ,这样分别启动两个文件来模拟客户端请求服务器的过程。当然你也可以选择继续使用 go test 的方式进行测试。这里只是做演示,表示测试也是有多种方法的。
我们在 zinx 文件夹下新建 Server.go 和 Client.go 的文件。 实际上,目前 Zinx 框架的对外接口并未改变,所以 V0.1 的测试依然有效。 所以,我们只是将 Server 和 Client 的功能进行拆分了。
Server.go:
1
2
3
4
5
6
7
8
9
10
11
12
13
14
15
16
17
18
19
20
21
22
23
24
25
26
27
28
29
30
31
32
33
34
35
36
37
38
39
40
41
42
43
44
45
46
package mainimport ( "zinx/znet" ) func main () s := znet.NewServer("[zinx V0.1]" ) s.Serve() } Client.go : `` `go package main import ( "fmt" "net" "time" ) func main() { fmt.Println("Client Test ... start") //3秒之后发起测试请求,给服务端开启服务的机会 time.Sleep(3 * time.Second) conn,err := net.Dial("tcp", "127.0.0.1:7777") if err != nil { fmt.Println("client start err, exit!") return } for { _, err := conn.Write([]byte("hahaha")) if err !=nil { fmt.Println("write error err ", err) return } buf :=make([]byte, 512) cnt, err := conn.Read(buf) if err != nil { fmt.Println("read buf error ") return } fmt.Printf(" server call back : %s, cnt = %d\n", buf, cnt) time.Sleep(1*time.Second) } }
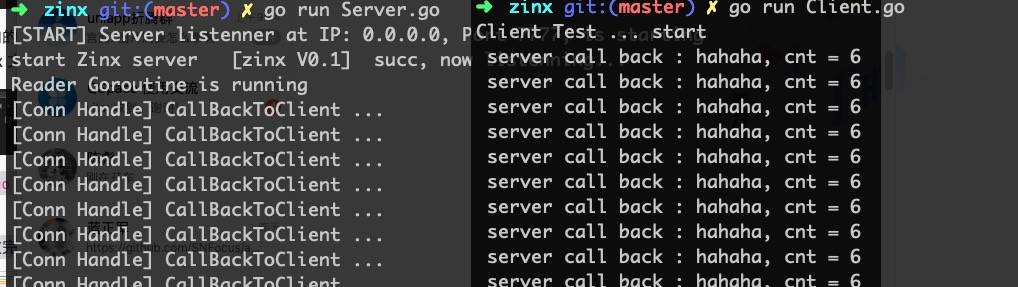
然后我们先启动 Server go run Server.go 再启动 Client go run Client.go。
我们可以看到,经过本次完善后,现在服务端就已经开始有回显数据的功能了。
知识点 关于Go defer的详细使用https://www.cnblogs.com/phpper/p/11984161.html
自我理解: 这些调用直到 return 前才被执。因此,可以用来做资源清理。(到return时,开始从下往上执行输出)